Getting Badgerboard to work with TTN

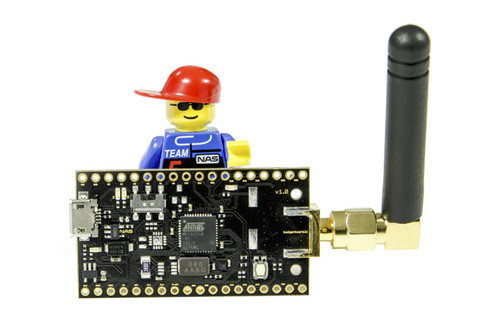
For those who received their Badgerboard last week: the hardware seems nice, but its Arduino library seems to be in some beta state (if only given the many commented/disabled lines of code), for which nothing really changed since December 13th.

I wonder if their frequency plan is set up correctly. (See errors below; no documented way to select a plan, I think, but maybe that should be in the firmware?) Also, its core library includes helpers that send the temperature and humidity readings or status messages. Those are not only quite funny needlessly complex, but also reserve a whopping 60 bytes to send JSON (not a good practice) and are sent as confirmed uplinks (very limited). And worst of all: it includes a duplicate of the FaBo HTS221 library, which breaks compiling other Arduino sketches that use the original.

So, forget about trying to fix that, but get the TTN Arduino library to run on it.

Running the TTN library on Badgerboard

Main problem: one needs to reset the RN2483 after powering or flashing the board, otherwise it will just not respond to any command (or any Serial1.write) and the TTN library will seem to wait forever. (I guess the board’s electronics could have done that too, but well. Still no schematics, I think.)

  1. Install the TTN library following its documentation.

  2. Install the FaBo 208 Humidity library, which also supports the temperature. (Using the “SmartEverything ST HTS221” library gives me warnings on the latest Arduino IDE; it will work, but the warnings are annoying, and the FaBo library gives the same results though it’s a bit older.)

  3. Uninstall any Badgerboard library (its included duplicate of the FaBo library throws errors; see below).

  4. In the Tools menu, set the board type to “LilyPad Arduino USB”, as documented for the board, and select its port.

  5. From the File, Examples menu, load one of the TTN example sketches.

  6. Somewhere above setup(), add:

     #define BADGERBOARD_LORA_RESET_PIN 5
     void resetBadgerboard() {
       debugSerial.println(F("Resetting Badgerboard RN2483 module"));
       pinMode(BADGERBOARD_LORA_RESET_PIN, OUTPUT);
       digitalWrite(BADGERBOARD_LORA_RESET_PIN, LOW);
       // In the original code, this has "sleep_wdt_approx(15)" here; unclear why
       digitalWrite(BADGERBOARD_LORA_RESET_PIN, HIGH);
     }
    
  7. In setup(), call that function:

     resetBadgerboard();
    

That’s it. Your TTN example sketch should work now. (Of course, set your keys and freqPlan.)

Getting temperature, humidity and battery level

Assuming you installed the FaBo HTS221 library above:

  1. Add the library to the top of your sketch (alternatively see menu Sketch, Include Library), and define a variable to use it:

     #include <FaBoHumidity_HTS221.h>
     FaBoHumidity_HTS221 hts221;
    
  2. In setup() add:

     // Initialize the built-in temperature/humidity sensor
     if (hts221.begin()) {
       debugSerial.print(F("Configured built-in HTS221 sensor: "));
       debugSerial.print(hts221.getTemperature());
       debugSerial.print(F("C, "));
       debugSerial.print(hts221.getHumidity());
       debugSerial.println(F("%"));
     } else {
       debugSerial.println(F("Failed to configure built-in HTS221 sensor"));
     }
    
  3. Somewhere above loop(), define a function to send the readings. The battery level is taken from badger_read_vcc_mv in the Badgerboard library, but only supporting LilyPad’s ATmega32U4. It yields higher values than the one TTN’s ttn.showStatus() prints.

     // Reserve 6 bytes (3 words) to send temperature, humidity and voltage
     byte data[6];
    
     void sendTemperatureAndHumidity(bool includeStatus) {
       // Encode the 2 doubles into the first 4 bytes
       int temp = 100 * hts221.getTemperature();
       int humi = 100 * hts221.getHumidity();
       data[0] = temp >> 8; // or: highByte(temp)
       data[1] = temp; // or: lowByte(temp)
       data[2] = humi >> 8;
       data[3] = humi;
    
       if (!includeStatus) {
         // Send 4 bytes on port 1, to know the format in the payload functions
         ttn.sendBytes(data, 4, 1);
       }
       else {
         // Also encode the battery level into the next 2 bytes
         ADMUX = _BV(REFS0) | _BV(MUX4) | _BV(MUX3) | _BV(MUX2) | _BV(MUX1);
         delay(2); // Wait for Vref to settle
         ADCSRA |= _BV(ADSC); // Start conversion
         while (bit_is_set(ADCSRA,ADSC)); // measuring
         uint8_t low  = ADCL; // must read ADCL first - it then locks ADCH  
         uint8_t high = ADCH; // unlocks both
         // Vcc (in mV); 1125300 = 1.1*1023*1000
         long vcc = 1125300L / ((high<<8) | low);
         
         data[4] = vcc >> 8;
         data[5] = vcc;
         
         // Send 6 bytes on port 2, to know the format in the payload functions
         ttn.sendBytes(data, 6, 2);
    
         // Just for debugging
         debugSerial.print(vcc);
         debugSerial.print(F("V, "));
       }
    
       // Just for debugging
       debugSerial.print(temp / 100.0);
       debugSerial.print("C, ");
       debugSerial.print(humi / 100.0);
       debugSerial.println(F("%"));
     }
    
  4. In loop(), send the readings; change false to true to include the battery level:

     sendTemperatureAndHumidity(false);
    
  5. In the application’s payload function in TTN Console, decode using:

     function Decoder(b, port) {
       // Use the port to determine if we just got temperature and humidity, or
       // the battery level too. (We could also use the length of the payload.)
       // All are MSB, Most Significant Bit/Byte first.
       // Port 1: 09A60CD2 = 24.70C, 32.83%; FE020CDF = -5.10C, 32.95%
       // Port 2: 09A60CD20D0B = 24.70C, 32.83%, 3339 millivolts
       if (port === 1 || port === 2) {
         var d = {};
    
         // Sign-extend the 1st and 3rd bytes into leading bytes to support
         // negative values (though humidity should always be larger than zero)
         d.celcius = ((b[0] & 0x80 ? 0xFFFF<<16 : 0) | b[0]<<8 | b[1]) / 100;
         d.fahrenheit = Math.round(100 * (32 + 1.8 * d.celcius)) / 100;
         d.humidity = ((b[2] & 0x80 ? 0xFFFF<<16 : 0) | b[2]<<8 | b[3]) / 100;
         
         if (port === 2) {
           // We should also have a battery level, which cannot be negative
           d.battery = (b[4]<<8 | b[5]) / 1000;
         }
         return d;
       }
    
       return {
         oops: "unsupported port"
       };
     }
    

If the temperature readings seem high: of course, it’s an on-board sensor, and the board might be above room temperature. If things don’t work for low temperatures, then see RN2483 problem temperature.

Known issues with the original Badgerboard library

Just for future readers/Google, some errors I got with the original library:

  • badger_print_EUI(devEUI) only prints the last two bytes?

  • Log shows (same for SF11) (solved?):

    Lora: Adding sensitivity: SF 9
    LoRa: warning. Spreading factor not set!
    LoRa: power not set!
    LoRa: datarate not set!

  • The Fabo HTS221 library duplicated in the Badgerboard library may invalidate other non-Badgerboard sketches that use the FaBo library as well: This is solved, but I did not test it:

    libraries/badgerboard/badger.cpp.o (symbol from plugin): In function ‘sodaq_wdt_enable(wdt_period)’:
    (.text+0x0): multiple definition of ‘faboHumidity’
    sketch/humidity.ino.cpp.o (symbol from plugin):(.text+0x0): first defined here
    collect2: error: ld returned 1 exit status
    Multiple libraries were found for “FaBoHumidity_HTS221.h”
    Used: /Users/arjan/Arduino/libraries/badgerboard
    Not used: /Users/arjan/Arduino/libraries/FaBo_208_Humidity_HTS221

And some warnings:

  • I’m not an Arduino nor RN2483 expert.
  • I wonder if the original Badgerboard library does better for battery live, and/or watchdog timers, and/or when waking from sleep.
  • I’ve not yet checked if battery level is reported correctly by the TTN library, nor what happens after sleep.
  • Most TTN code uses loraSerial.begin(57600) which works fine, and is Microchip’s documented default. The Badgerboard library uses 19200, but it seems they are in doubt.
4 Likes

To add: I got errors compiling older sketches after installing the badgerboard library because they included some kind of incompatible LowPower library. I had to remove the badgerboard/src/lowpower.h and badgerboard/src/lowpower.cpp file to get my old sketches to work again.

I’m not sure what the battery function is measuring. Maybe only the LiPo connector, which I’m not currently using. Apparently:

this function measures MCU supply voltage (after LDO) so this can’t be over 3.3 but it starts falling if battery is emptying until 2.7V which is marked as MCU minimum operating voltage

When using the USB port, or when connecting a battery pack to Vin and GND, I always get 3.339 for the Badgerboard function, and always 3.283 for the response of the RN2483 sys get vdd command. (Another Badgerboard always reports 3.41 for the Badgerboard function and 3.325 for Vdd.)

The sys get vdd command is documented by Microchip as:

2.3.6.3 sys get vdd

Response: 0-3600 (decimal value from 0 to 3600)

This command informs the RN2483 module to do an ADC conversion on the VDD. The measurement is converted and returned as a voltage (mV).

Badgerboard’s technical specifications do not indicate how Vdd is connected, but such a constant value would indicate a very good voltage regulator? :wink:

Then I’m afraid the same applies to the Sodaq_RN2483 library. (So: reported.)

got this input from NAS http://badgerboard.io/ today:

The first (hardware specific) steps of the tutorial https://www.thethingsnetwork.org/docs/devices/uno/quick-start.html we recommend to replace with Badgerboard lib https//github.com/nasys/badgerboard (HW reasons). If you have TTN gateways nearby follow the TTN tutorial from Create an Account paragraph up till Message your Device since its about registering your device in their service. Badgerboard library will have helper functions for receiving data from gateway in few days, so that the TTN tutorial can be easily followed to the end.

Anything more specific than just “hardware reasons”?

Looking at the current state of their software and the lack of any documentation, I’d stick with the TTN software. Also, they responded to one of the issues I raised saying:

[
] Badgerboard is meant mostly for making proof-of-concepts [
]

It’s still a nice board, but I feel they should just document the wiring. Or open source the schematics like they promised when it was still a Kickstarter project, so we can figure out ourselves how to use the board. Just my 2 cents though.

3 Likes

I asked them to comment here - I am pretty new to LORA and need to understand how to :slight_smile:Your post is highly appreciated - will try to follow when I have time

Just noticed that for “low” temperatures (say 10 ÂșC, not really low) the FaBo library or the HTS221 sensors report values such as 1212.51 ÂșC.

These are then sent as negative values, due to the integer 121251 exceeding the maximum value for 2 byte signed integers, which have a range of −32,768 to 32,767. (The hexadecimal value 0x01D9A3 is sent as 2 bytes in 0xD9A3 which decodes back to -98.21 ÂșC.)

Will investigate later


Our apologies for extremely delayed schemetic update, but it will be up for everyone in next week for sure!
The hardware wiring is documented in here:
http://badgerboard.io/wp-content/uploads/2016/11/badgerboard_pinout.pdf

3 Likes

That’s good news, @anni. For the wiring I meant to refer to internal wiring, such as wiring from MCU to RN2438, the sensor, the LiPo charger and all. That would allow people to figure out if something special is needed for the software. However, if the schematics are provided then that is surely covered, nice.

Hi!
I have trying to connect my badgerboard with the bagerboard library with ABP and have no success.
Im using the standard library for bagerboard and Lora_temp_hum_ABP.ino. It’s compiling but I get some error when trying to send “Bootmsg”. I have used the debug and this is what I get.

Configured onboard temp/humidity sensor.
badger temp/hum sensor
devEUI 01:02:03:04:05:06:07:08
Start initABP
[initABP]
[init]
[wakeUp]
[wakeUp]
[resetDevice]
[expectString] expecting RN.(RN2483 1.0.1 Dec 15 2015 09:38:09) found a match!
[wakeUp]
The device type is RN2483
[setMacParam] devaddr = [array][expectString] expecting ok.(ok) found a match!
[setMacParam] appskey = [array][expectString] expecting ok.(ok) found a match!
[setMacParam] nwkskey = [array][expectString] expecting ok.(ok) found a match!
[setMacParam] adr = off
[expectString] expecting ok.(ok) found a match!
[joinNetwork]
[expectString] expecting ok.(ok) found a match!
[expectString] expecting accepted.(accepted) found a match!
[sleep]
[wakeUp]
[wakeUp]
[sendReqAck]
[setMacParam] retx = 2
[expectString] expecting ok.[sendReqAck] Non-fatal error: setting number of retries failed.
[wakeUp]
extrawakeupeakeup
[setMacParam] retx = 2
[expectString] expecting ok.[macTransmit]
[expectString] expecting ok.[lookupMacTransmitError]: accepted
[lookupMacTransmitError]: found 14
LoRa warning: accepted
[sleep]

It’s looks like the string “accepted” is still in the line after the Joinnetwork gets accepted.

Anyone has experience the same or have an idea how to fix ?

Regards NoX

Hi everyone, you can find the schematics from github: https://github.com/nasys/badgerboard/tree/master/schematics

I just saw that you have uploaded the schematics. How do I open it? I’ve tried open the .sch with KiCad without success. Isn’t it easier to just upload a PDF or something also ?

Or can you recommend any freeware to open the schematics with ?

Regards NoX

Hi @nox1989, the PDF file will be up soon as well, meanwhile you should be able to get PNG & SVG from https://schematics.io

1 Like

Here is the PDF file: BB-M-1_0.pdf (163.7 KB)

2 Likes

Just want to hear how you Badger board is performing; we have had a TTN workshop here in Cph and now I can work on getting my Badger connected Greetings, Gernot

Sorry, I am not really using them.

I still had one running that I also used for this topic, so: not using any of the Badgerboard libraries. Looking into that device now:

  • It had somehow downgraded to SF12 (might be a TTN ADR issue?). Cycling its power made it go back to SF7.

    (My code was sending 8 bytes plus a 13 bytes LoRaWAN header, and used delay(5000) in the loop. On SF12, with a total 1483 ms airtime, it was only possible to transmit every 1190 seconds, almost 20 minutes. For SF7 with 57 ms airtime, transmitting was only possible every 49 seconds. These delays were caused by disabling 7 of the 8 default channels. This rightfully caused no_free_ch due to the very low maximum duty cycle of 0.125% for single channel nodes.)

  • Like mentioned above, when running on a mains adapter, the reported voltage level is always the exact same value (3.283 for this very board, and 3.325 for another one I tested earlier).

  • The temperature reading this one board gives is about 7 degrees Celcius too high at room temperature. (If not due to it being an onboard sensor, then maybe due to using different libraries; I did not compare to another Badgerboard.)

  • It does not work on battery packs that have some smart power management, as it draws too little current, making my battery packs switch off automatically :slight_smile:

Also, shame on me for not switching it off after I was done testing


1 Like

I have the same problem you have with the temperature sensor. It’s reading a couple degrees higher then any other temperature sensor I have.
Also have the same problem with my powerbank. To low current so it switch off after 30 sec or so.

I have mailed badgerboard twice about the faulty temperature sensor and haven’t even got a replay on those mail.

I have also noticed that on their site its says “Stand by 200 uA”. While mine is in full sleep it draws around 400-500uA.

Updated my badger board RN2483 firmware to version 1.03 using the Lora java tools in the ink below, upload the TTN passthough example code first of course - works well.

https://www.thethingsnetwork.org/forum/t/rn2903-au-firmware/7127/9?u=jezd

Would be curious if those measuring sleep current find this update helps?

Maybe I’ve missed something re the voltage measurement side of this thread, but as the atmega32u4 is sat behind the voltage regulator all we can expect is a steady 3.3v (approx, small variations withing the circuit can be expected) regardless of usb/lipo connection and regardless of the lipo charge level, looking at the circuit I am (entirely) guessing that the only way to get the lipo V state is a voltage divider setup?