The schematic:
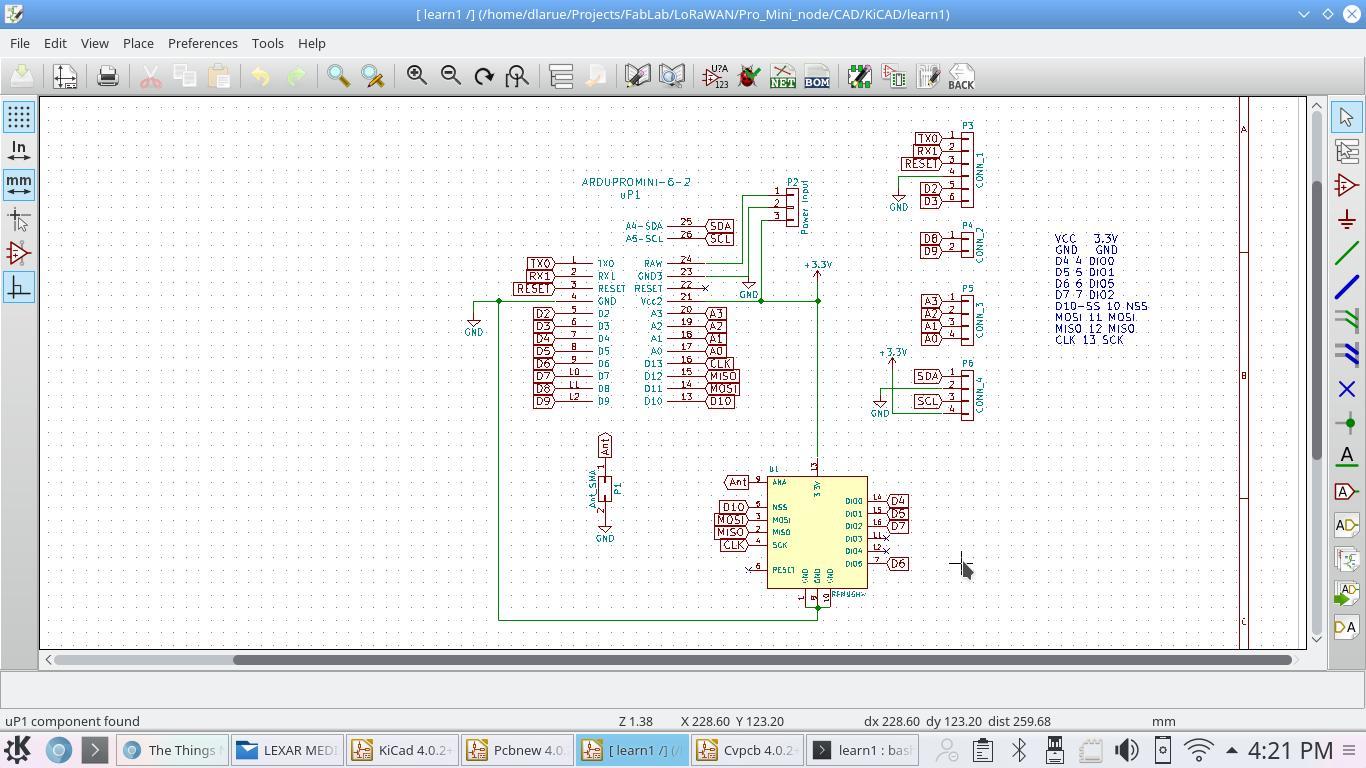
The schematic:
Nice work! It looks like the wiring is different, but that pretty likely since there is no real reason to choose for a certain wiring. Probably a lot of more different wirings also exist… Perhaps we should just deal with it by adding something like a pin-layout-string to the code. By doing so we only have to copy/paste a single line instead of renumbering a block of code, which is annoying work and also frustrating because of potential typo’s.
I noticed in your mail that you do use some RFM pins that are not used in my version. Could you please send me a working sketch so I can check which values are needed in such a string? Or could you test the ttnmapper sketch on my github to see if it works on your node when you renumber the pins?
all my code is on git( dlarue (Doug LaRue) · GitHub ) and you’ll want LoRa-LMIC-1.51 ( the CPP version ) or arduino-lmic( the C version ). If you grab the example named proMini-lmic-v1.51-F from ( LoRa-LMIC-1.51/libraries at master · dlarue/LoRa-LMIC-1.51 · GitHub ) you will see there is pin mapping for the pins used:
// Pin mapping
// These settings should be set to the GPIO pins of the device
// you want to run the LMIC stack on.
//
lmic_pinmap pins = {
.nss = 10, // Connected to pin D10
.rxtx = 0, // For placeholder only, Do not connected on RFM92/RFM95
.rst = 0, // Needed on RFM92/RFM95? (probably not)
.dio = {4, 5, 7}, // Specify pin numbers for DIO0, 1, 2
// connected to D4, D5, D7
};
If you grab the example named tcn-scn-abp from ( GitHub - dlarue/arduino-lmic: LoraWAN-in-C library, adapted to run under the Arduino environment ) you will see there is pin mapping for the pins used:
// Pin mapping
const lmic_pinmap lmic_pins = {
.nss = 10,
.rxtx = 0, //LMIC_UNUSED_PIN,
.rst = 0,
.dio = {4, 5, 7},
};
These code bits are for Single Channel client and servers.
added code for the MQ135 gas/air quality sensor. It takes between each message a maximum of 100 measurements and sends the average value.
A few notes;

Hi Doug,
Many thanks for the design, I’ve just ordered a set of three.
Regards
Dave
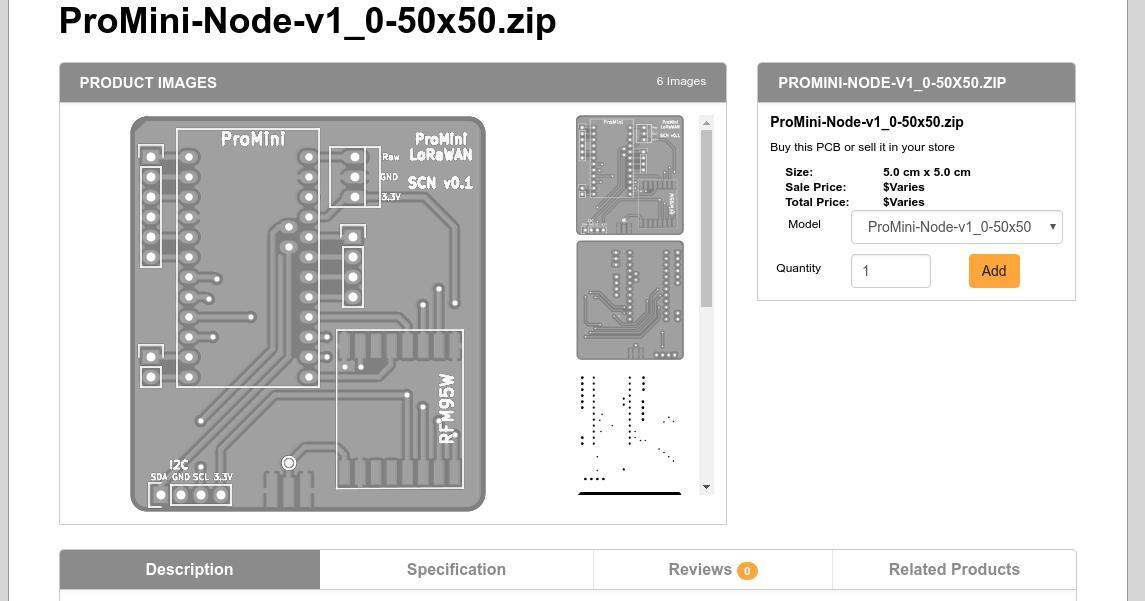
I also resized the board so we can get them 10 for $15 from DirtyPCBs.com with generally the same 2+ week turn around time as OSH Park. Change the board thickness from 1.2 to 1.6 after you select the order. My first boards were a pinch small for the SMA edge mount antenna connector and required epoxy to make sure they were strong.
http://dirtypcbs.com/store/designer/details/13122/1115/promini-node-v1-0-50x50-zip
Really a great price, I didn’t knew you could get them that cheap there.
ok, I updated the link so it should be ok. I resized the board so it fits their cheapest size constraints for 10 boards $15 for 10. Make sure you see a price like that or you might have to fiddle with an option. I go with the +/-10 and got 10 boards for ~$15. And remember to set the thickness to 1.6mm instead of the default 1.2.
I ordered the PCBs. Thanks for the design. 
That’s great @sa5bke and I’m just pleased others are finding them useful too. There is some extra space in one corner off of the power connector and I’m thinking of doing some revisions with some circuitry options there.
I would love to hear of options people would be interested in along with a schematic of the circuit or links to them. I’m willing to put the time in to develop the PCB with those options if you’re willing to order and test them.
I think the design looks great. And to make something clear; I don’t mind that much if different families of wiring exist, but if almost every node was wired differently life would get difficult. We’re also considering a merging engine that would merge basic code, sensor specific code and keys to a complete sketch. It’s a small thing to also add a section for the pin mapping in such a design.
So i’d say go for it
btw we ported the dustduino air quality measuring setup to run on such a node. I’ll post the code in a few days. Those who are interested may already want to order a PPD42NS
right, pin mapping. From the LMIC based node code in my repository( github.com/dlarue ):
// Pin mapping
const lmic_pinmap lmic_pins = {
.nss = 10,
.rxtx = 0, //LMIC_UNUSED_PIN,
.rst = 0,
.dio = {4, 5, 7},
};
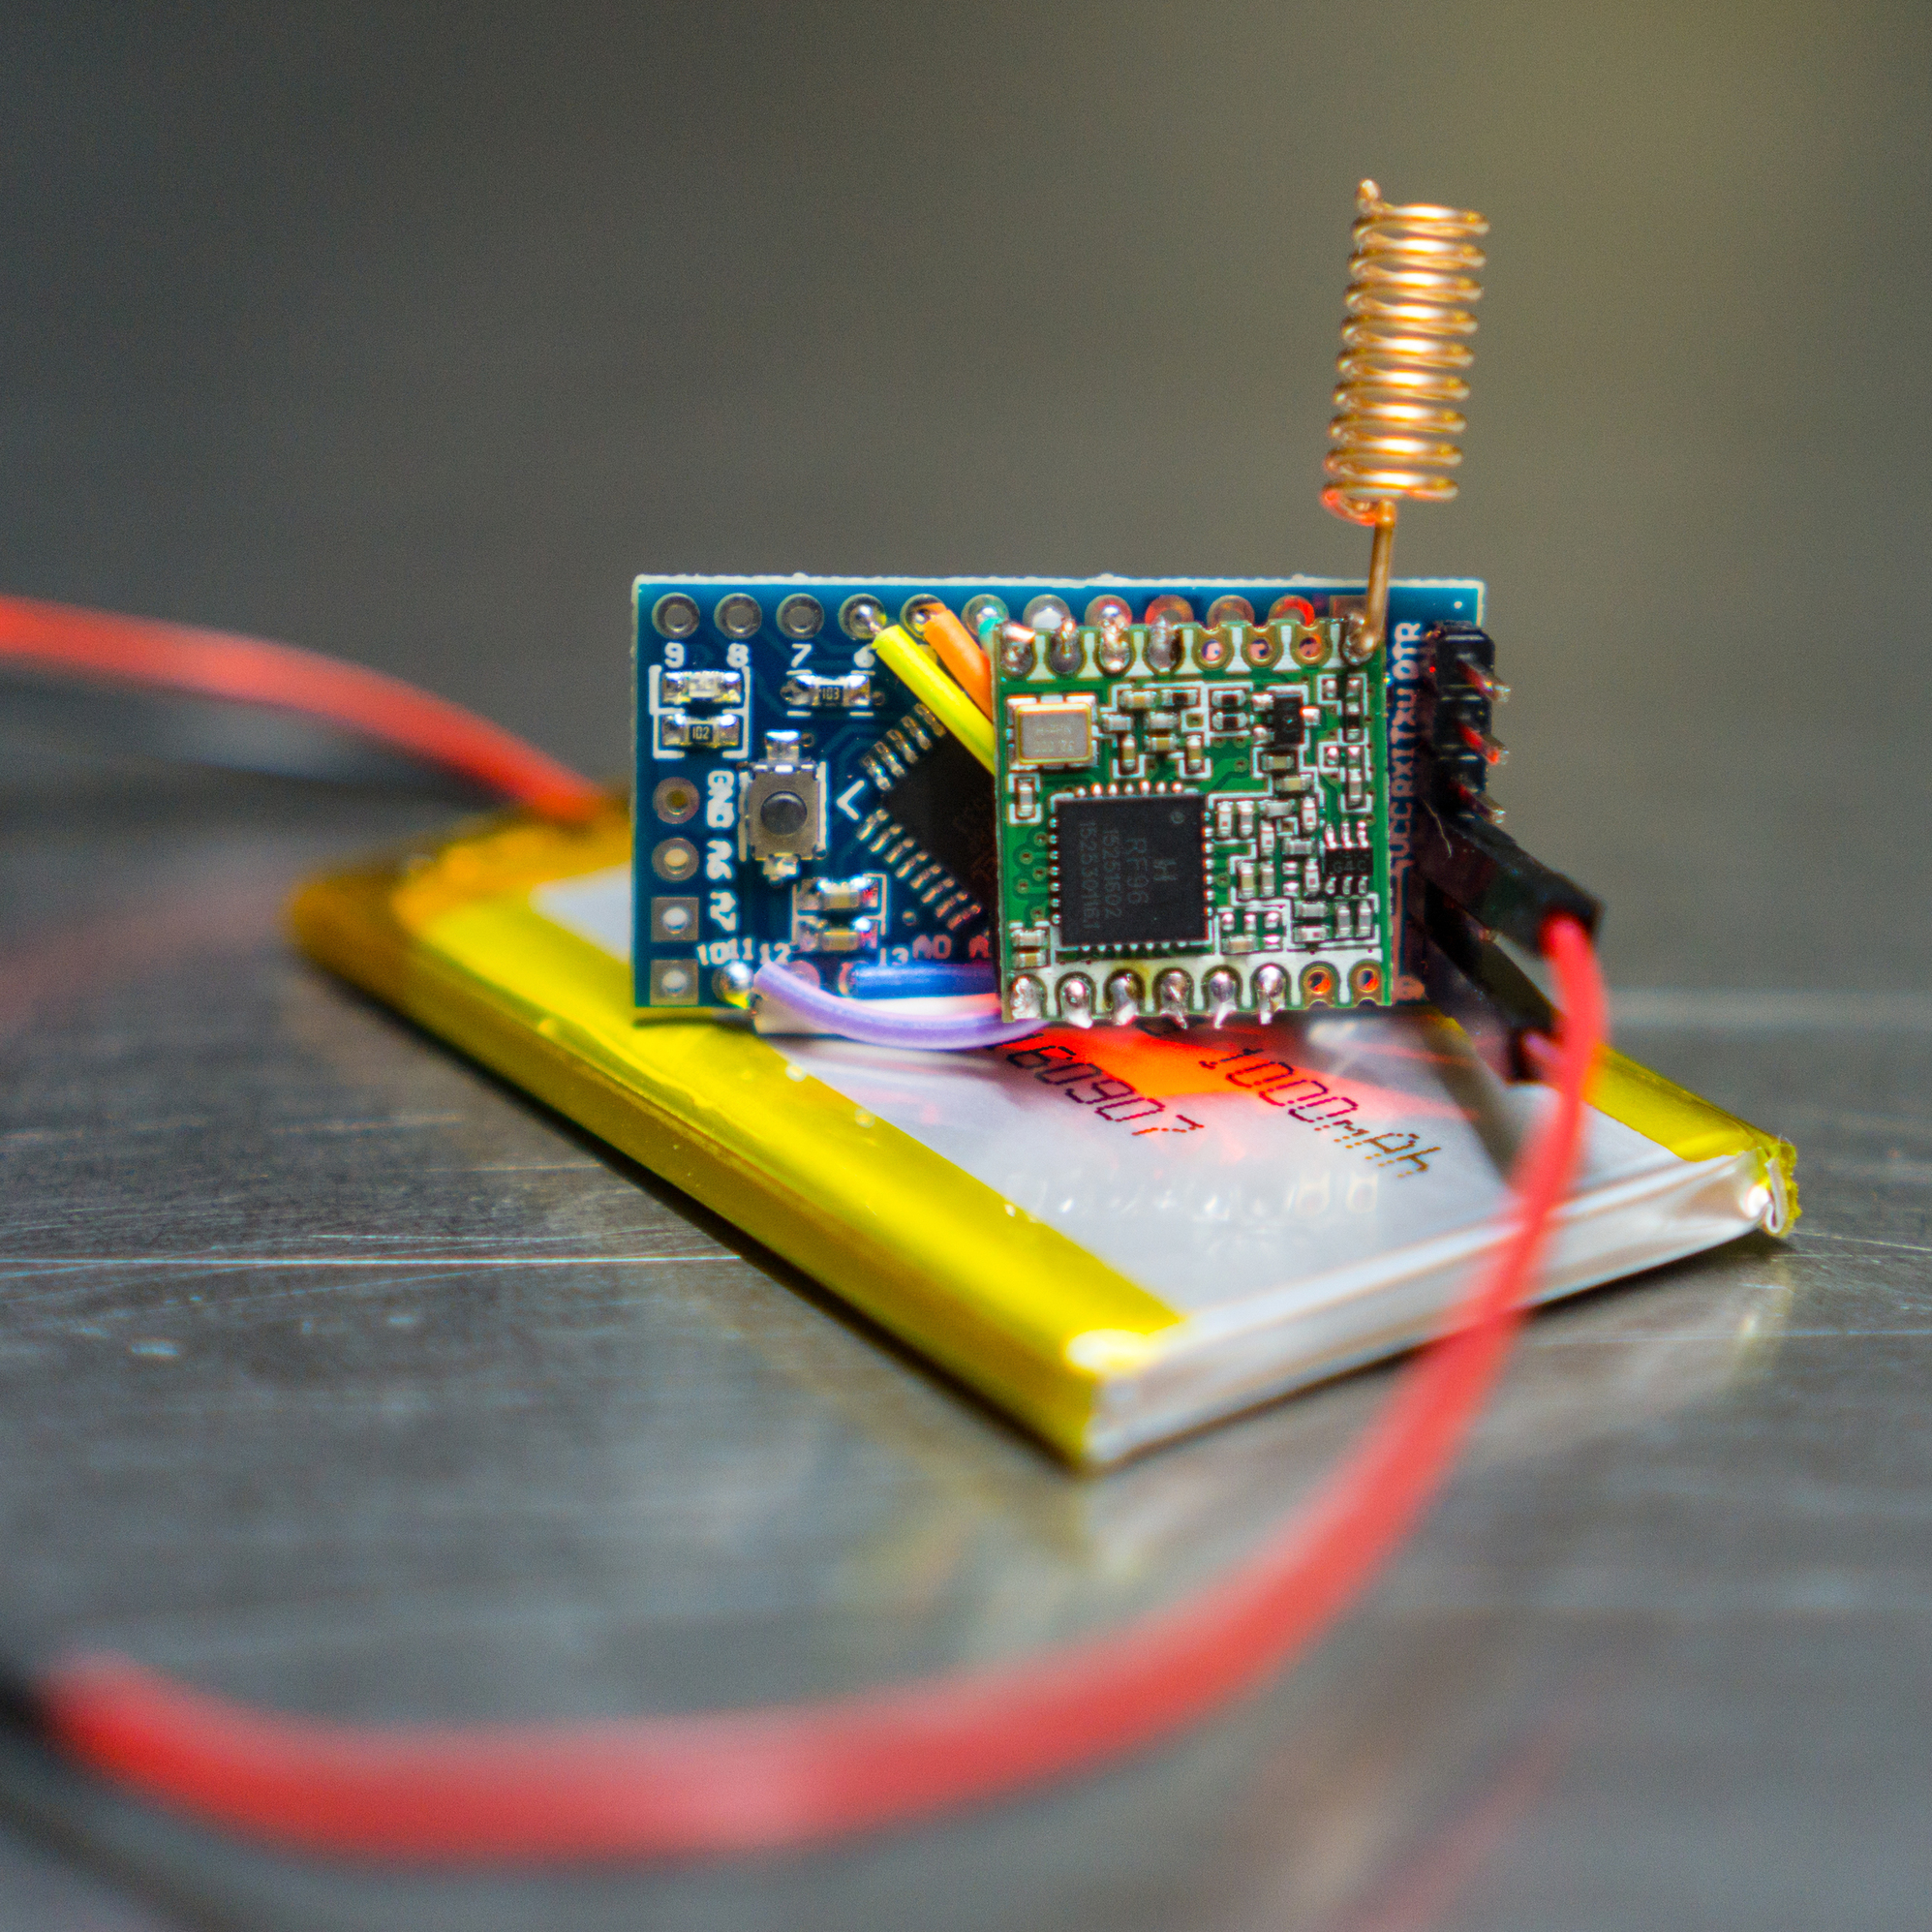
Finally we got our first “possible cheapest node” running on battery, thanks for the tutorial:
Hi Tijn,
Great work on those sensor examples. Is it possible to make a demo for the ds18b20 temperature sensor? I tried to work it out but somewhere it failed.
Thanks in advance.
groet,
Waldemar
I think I’ve got an example somewhere… If I remember correct it wasn’t very clean but it did work so I’ll have a look somewhere the next few days. It is important not to use pin 10 as a signal pin for that sensor since it’s kind of reserved. We got stuck for a week or so because of that.
… and the dustduino example. https://github.com/tijnonlijn/RFM-node/blob/master/dustduino_PPD42NS_example.ino
As kind of Christmas present I’d also like to show you a sneak preview of something that will make this topic obsolete in the near future. We’ve been working on a generator that will allow to generate the node software without any coding. Special credits to @jdelaet who did the development and will show the details of his work in the near future by writing a Labs story.
Screenshot of the prototype

stay tuned 
This is it, as-is. Just give it a try i’d say: https://github.com/tijnonlijn/RFM-node/blob/master/scratch_temperature_300_lowpowersec.ino
Thanks, this one is working perfectly!