How to connect Utrecht E&A exhibition KISS LoRa to TTN?

thx,
I will try
From TNTmapper i should have a decent signa (red brown yellow)l from TNT de Mheen here at morellenlaan

If you live there you have for sure coverage. Probably indoor!

I just uploaded the TheThingsNetwork example test TheThingsNetwork sketch, with the keys and device address as found in the console. I still get the:
_Sending: mac join otaa _
Join not accepted: denied
Check your coverage, keys and backend status.
messages.

I am located at the east part of Utrecht right now (Sartreweg), according to ttnmapper I should (at least) have some coverage.

that’s my home indeed.
at 15:40 suddenly (after off-on) i had contact
went on bike to the mheen to do some shopping.:
dtata packages every 30 seconds.
On return home: no more packages received
So it must be something like poor coverage (snif)

I have some more info.

  1. There must be coverage through a LoRa network. Check out https://www.thethingsnetwork.org/map
  2. On the stock market, sufficient coverage was achieved by the companies themselves.
  3. The coverage is certainly not complete yet. There are still many white spots.
  4. In addition, there are communities. See https://www.thethingsnetwork.org/community
  5. There is a possibility for purchase antenna inside and outside. Wifi, internet, subscription etc. are not required. Of course, the LoRa network already exists.

Ask me a question and the challenge for a search: what does an antenna / gateway cost?

1 Like

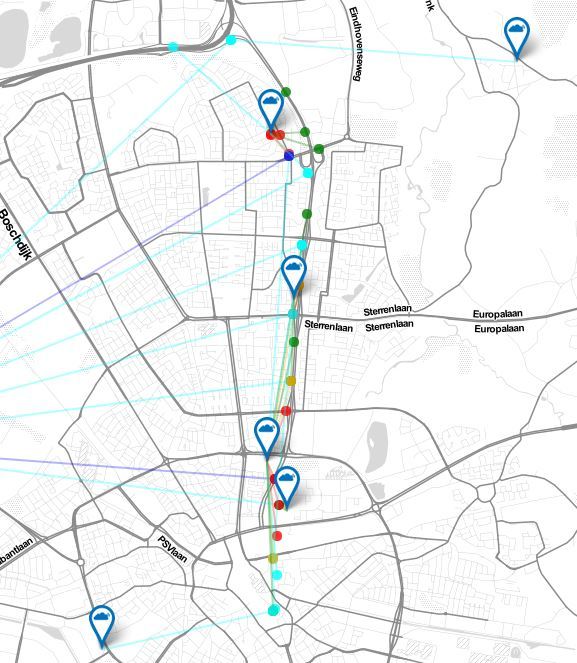
Today i have tested the Kiss-Lora cycling to Eindhoven-centre using ttnmapper.org

You see a very poor coverage, despite of the fact that there are enough gateways, and the ttnmapper map shows good coverage. If i compare the result with nearly the same route a week a go with a ‘standard’ RFM95 node with a short antenna, i have a much better connection.
-> EDIT: I was not satisfied with the result. I did another slightly different tour, removed the esd bag (LOL), and it was pretty good with the sensor in my hand:

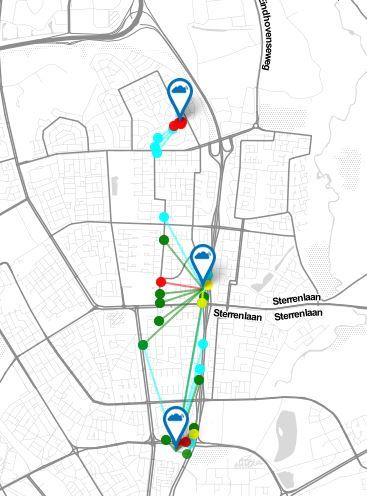
Feather M0-RFM95 combo:

2 Likes

Hi, I missed step 5 on my order-picking list at the EA-fair. Now I am trying to get the kissLoRa working, So far I got the device commisioned but no data in the app. I did read the hints and tips from the others above.
Here in hilversum the first node is the train station, 1km away. The rotery dail on 0.
Is there a way yo increase the power? I looked in teh schetch and did not find it?
Any tips?

Regards
Hans-Willem

When I got home my device wasn’t working at all… no blinking blue led or what so ever.
After recharging the battery it was still not working.

I downloaded the github code and changed the keys as mentioned.
Uploaded the code and seems to work as it worked before… but no data is show in my portal.
The terminal on the other hand shows successful transmissions ?!?!?!?

Are the other parts of the code that have to be changed to get data on your portal?
line 71 onwards

//TheThingsNetwork anonymous config
static const char *devAddr = "26011F0F";
static const char *nwkSKey = "ADAFF80790E39125AD12F170768A6A97";
static const char *appSKey = "B98AEF49D4D819536FDD511544FCC49B";

Be aware that the security keys in the device and in your ttn console must match.
(that what’s done during commisioning
So i think you have to add your device again

Question for you: I am trying to see the serial data om my(windows 10) PC
I am using the usb cable and a terminal program called Termite
the (usb) port is set to 9600 baud, 8 dat bits, 1 stop bit, parity none, flow control none
But I do not see any data in the terminal window
(switching off, switcing on, connect termite)

What do you use ?

(

I think normally you don’t need to change these codes as the device was configured for OTAA. The configuration is stored in the RN2483 itself and doesn’t need to be set by the code (provisioning devices from code is not really scalable :-)). If you want to change to ABP activation you can change the settings of your device in the console to ABP, then copy these ABP setings to the code you mentioned and set the appeui to all zero’s (and the appkey to any value) using a command like:

setappeui:00000000000000000123456789012345678901234567890123456789012

during the time that the device is in commissioning state (blinking blue led near the push button for first 10 seconds on USB power, don’t forget to remove the battery first). Having the device with ABP configuration might give better results when coverage isn’t optimal The previous construct is no longer supported in the latest code.

long time ago i knew a lot of mainframe, mini and microcomputers + a bunch of programming languages.
(still do a bit)
This arduino stuff is new for me
I read last days a lot and I am learnig a lot.
So a beginners question: What does OOTA and ABP mean ?

Sorry for that, you are right: These days we use Google a lot ;-), a search on LoRaWAN, ABP and OTAA pointed me to this forum message, hope that helps.

1 Like

OTAA - Over The Air Activation
ABP - Activation By Personalisation

It refers to the way the keys required for encryption are acquired. With ABP these are set when provisioning the device and will be reused after a reboot which makes communication less secure. With OTAA the keys are exchanged (secure) when the device (re)‘joins’ the network, every join uses new keys.

N.B. couple of hints for those new to LoRaWAN:

  • To prevent replay attacks LoRaWAN uses frame counters. The node starts with 0 on power on, the back-end stores the last seen value. So for ABP to nodes packets will be ignored until the frame counter exceeds the value stored in central database. For OTAA the join procedure resets the counters in the database to 0 so all transmissions will be considered new and valid.
    For people insisting on using the less secure ABP, there is a checkbox in the node details to disable the frame counter check. The network will still ignore packets with the same counter and data, considering it duplicate data. (Which means resetting the counter after each transmission while sending static data does not result in data for your application)
  • When using OTAA there is no need to rejoin the network every X amount of time, the node stays joined as long as it keeps track of the keys exchanged during the join and the ‘current’ frame counters.
1 Like

The baudrate is 115200

the terminal I used was Arduino. It has an buildin terminal

Uhm… ok.
When I reprogrammed the atmel I noticed the key on the terminal was not corresponding with the key on my device page. It was the hard-coded key in the Arduino code. After changing the hard-coded key to the one I saw on my device page at least that key now popped up on my terminal when it was transmitting data.

I will try to send the key (setappeui) like you suggested to see if it helps…

If your device used the hardcoded ABP keys then it probably wasn’t provisioned yet, causing it to use the hard-coded ABP parameters.

Please note that the setappeui command is only valid if you reprogrammed it with the default KISSLoRa-demo_app. If you used one of the examples that use LoRaWAN communication then the OTAA parameters AppEUI and AppKey need to be modified in the code itself.

The command I mentioned sets the AppEUI to all zeros causing the KISSLoRa-demo_app code to use the ABP parameters devAddr, nwkSKey, appSKey as set in the code. This is no longer supported in the current code, I guess the developers don’t like ABP :wink:

Best way to understand is to read the code off course. Probably the authors didn’t intend the use it this way, but it is an easy way to change from OTAA to ABP (but note the disadvantaged of that as mentioned above). Note that the links above might become “off” when the code is changed in the future

Something went wrong during commissioning of my device. Maybe the battery should not have been connected before commissioning at the terminal (2), but I got instructions to do so. Anyway, I still saw a spinner on the web-page to commission on the next day.

So what was correct; in the Console, the kiss app and the kiss device was configured, including integrations (http and database) and a payload format decoder.

What was not correct; On my TTN gateway, I received messages from the hardcoded DevAddr (26011F0F). This is a default code in the Arduino source at the https://github.com/YourproductSmarter/KISSLoRa-demo, in the demo app. Since every device should have a unique number, I guess the OTAA didn’t work out correctly in my case.

After some attempts for minor reconfigurations, I decided to do the following:

  • Then install Arduino, board and libraries using https://github.com/YourproductSmarter/KISSLoRa-demo
  • Then follow the TX RX example using https://github.com/YourproductSmarter/KISSLoRa-demo/tree/master/Examples/LoRa_TX_RX, program the device, look in the Arduino Serial Monitor for the DevEUI
  • At the Console, within the kiss-lora application, created a second KISS-LORA device, using OTAA (use the DevEUI printed in the Serial Monitor in the Arduino app)
  • Then copy over from Console > Applications > kiss-lora-xx > Devices > kiss-lora, the Overview tab, scroll down to the Example code. These lines are to be copied to the Arduino sketch of the TX RX
  • Adjust the TX RX example with the copied two lines of OTAA appEui and appKey, and upload the sketch to the device again.
  • Using this, I see messages coming in the Console > Applications > kiss-lora-xx > Devices > kiss-lora, and select the Data tab
  • Also, in the Overview tab, you can enter a value in the Downlink, like 00, press Send, and at the next communication from the device to TTN, the downlink message is returned to the device, and the RGB led switches ON or OFF (alternates).

Integrations

  • In Console > Applications > kiss-lora-xx, select Overview tab, scroll down to Access Keys, press copy-to-clipboard.
  • Then select Integrations tab, then Data Storage and Go-to-platform which opens Swagger in another tab
  • Then at the top, press Authorize, then in the dialog paste the Access key
  • Then click Query and try it out, and a JSON list of raw messages is returned.

So the above now works, so it is time for the KISSLoRa-demo_app

1 Like

I"ll try 115200 baudrate.
In the code at https://github.com/YourproductSmarter/KISSLoRa-demo at line 145

Start serial ports
loraSerial.begin(57600); //RN2483 needs 57600 baud rate
usbserial.begin(9600);

So i am confused: which program is loaded in de Kiss Lora gadget

at 115200:
usb cable in PC
port com4 set at 115200, 8 bits no parity, one stopbit

Kiss lora (rotary switch positio9n 0) switch on --> 10 sec blinking blue light
termite terminal program connected to com 4

I get no characters coming in the terminal and no connection in ttn console and no blue light blinking every 20 seconds.