Have a look at this issue I posted at dragino, I copy it full here anyway, shuld be able to flash other ST devices too:
Thanks a lot for taking the time to write this, @didebuli!
It helped me a lot in order to get this working under OS X, as I experienced the same problem while trying to flash from a VirtualBox Windows10 VM (Firmware seemed to be flashed but it wasn’t).
You got me inspired so wanted to share the procedures to natively work under OS X (Serial comms) and on how to upgrade the firmware for those using macs:
Upgrading Dragino LGT-92 firmware under OS X
1.- Getting Set / Requirements
- 1.- Install Xcode CLI tools
- 2.- Install Your USB2TTL Adapter VCP Driver
- 3.- Check Serial Comm Utility can actually talk with LGT-92
1.1.- Xcode
- 1.- Install Xcode from App Store
- 2.- Install XCode CLI Tools: Open Applications/Utilities/Terminal and issue
xcode-select --install
To check CLI Tools are already successfully installed:
Kratos:~ root# xcode-select
xcode-select: error: no command option given
Usage: xcode-select [options]

Print or change the path to the active developer directory. This directory
controls which tools are used for the Xcode command line tools (for example,
xcodebuild) as well as the BSD development commands (such as cc and make).

Options:
  -h, --help                  print this help message and exit
  -p, --print-path            print the path of the active developer directory
  -s <path>, --switch <path>  set the path for the active developer directory
  --install                   open a dialog for installation of the command line developer tools
  -v, --version               print the xcode-select version
  -r, --reset                 reset to the default command line tools path
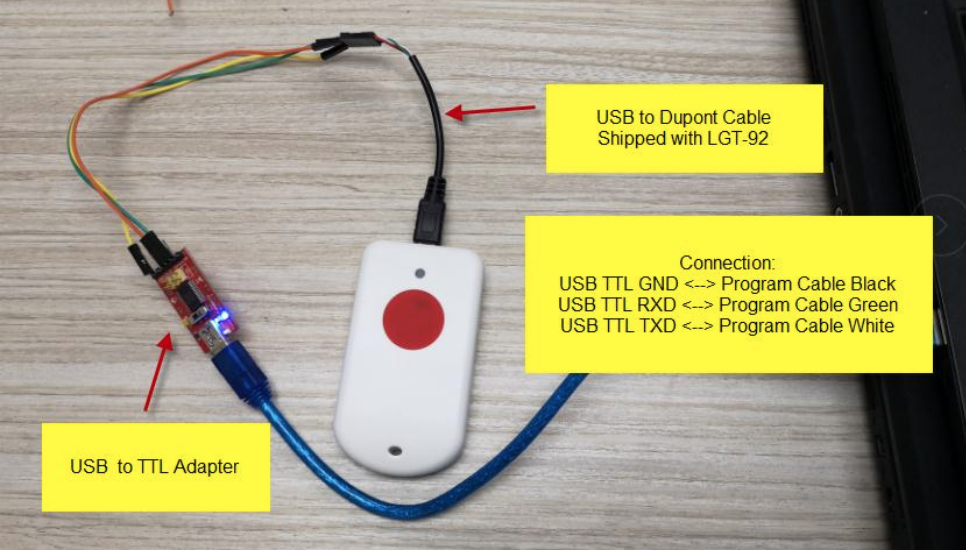
1.2.- Install your USB to TTL Adapter VCP Driver
After installation of the driver and rebooting, in order to determine which device file OS X uses to communicate with the USB Adapter:
# ls -l /dev/cu.*
crw-rw-rw-  1 root  wheel   21,   3 Feb  7 09:27 /dev/cu.Bluetooth-Incoming-Port
crw-rw-rw-  1 root  wheel   21,   5 Feb  7 09:27 /dev/cu.LG-PK585-SPPDev1-3
crw-rw-rw-  1 root  wheel   21,   7 Feb  7 09:27 /dev/cu.LG-PK585-SPPDev2-2
crw-rw-rw-  1 root  wheel   21,  33 Feb 13 12:53 /dev/cu.SLAB_USBtoUART
We see here our device is /dev/cu.SLAB_USBtoUART
Tip: If you use OS X >= 10.13 and don’t see any device file, check https://developer.apple.com/library/archive/technotes/tn2459/_index.html
1.3.- Serial Comm Utility and Testing
OS X has serial comm CLI utilities installed by default, like cu and screen that we can use for serial communication to finish the upgrade procedure.
To test serial communication is working using cu, open Applications/Utilities/Terminal and issue:
Kratos $ cu -s 9600 -l /dev/cu.SLAB_USBtoUART -h
Connected.
atz^M
Roll=1.46  Pitch=3.32
North: 37.408978
West: -6.164614

[265654490]***** UpLinkCounter= 1031 *****
[265654890]TX on freq 867100000 Hz at DR 5
Update Interval: 30000 ms
[265654957]txDone
Wait a little, you should see LGT-92 activity debug scrolling; if so, USB 2 TTL communication is working!
Tips:
- To exit
cu, type ~. followed by ENTER
- If no serial communication happens, double check the wiring:
2.- Homebrew / openocd tools Installation
2.1.- Homebrew
Homebrew is a Opensource package manager / Opensource repository, which works similar to apt, yum, rpm, etc, bringing easy to install/build packages for most OpenSource Projects under OS X.
We will use it to easily install openocd tools in OS X, which will allow us to flash the LGT-92.
If XCode is already installed, usually all that is required to install homebrew is to:
/usr/bin/ruby -e "$(curl -fsSL https://raw.githubusercontent.com/Homebrew/install/master/install)"
2.2.- Install openocd tools using homebrew
- 1.- Open Applications/Utilities/Terminal
- 2.- Execute, as a regular user:
Kratos $ brew install openocd
A bunch of text will scroll in the screen (too much to paste it here), check that at the end:
...
==> Pouring open-ocd-0.10.0.high_sierra.bottle.2.tar.gz
🍺  /usr/local/Cellar/open-ocd/0.10.0: 632 files, 4.6MB
3.- Flash Firmware Procedure
Comprises:
- 1.- Download Firmware
- 2.- Flash Firmware
- 3.- Reset to Factory Defaults
3.1- Download Firmware
Note the path where you save the file, /Users/myusername/Documents/_LORA/DRAGINO/EU868.hex in this example; you’ll need to substitute this in the openocdcommand on step 2 of Flash Firmware section.
Tips:
- Drag and drop the firmware file from Finder to the Terminal window: path to it will be autowritten in Terminal command line; see animated gif.
- Make sure the path doesn’t contain spaces (just in case!)
3.2.- Flash Firmware
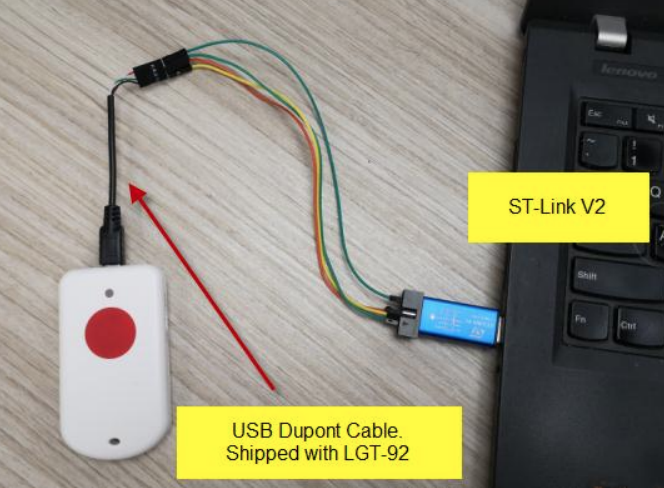
- 0.- Connect ST-LINK v2 Device to LGT-92
Wiring:
ST-LINK v2 5.0v  <--> Dupont red pin
ST-LINK v2 GND   <--> Dupont black pin
ST-LINK v2 SWCLK <--> Dupont green pin
ST-LINK v2 SWDIO <--> Dupont white pin
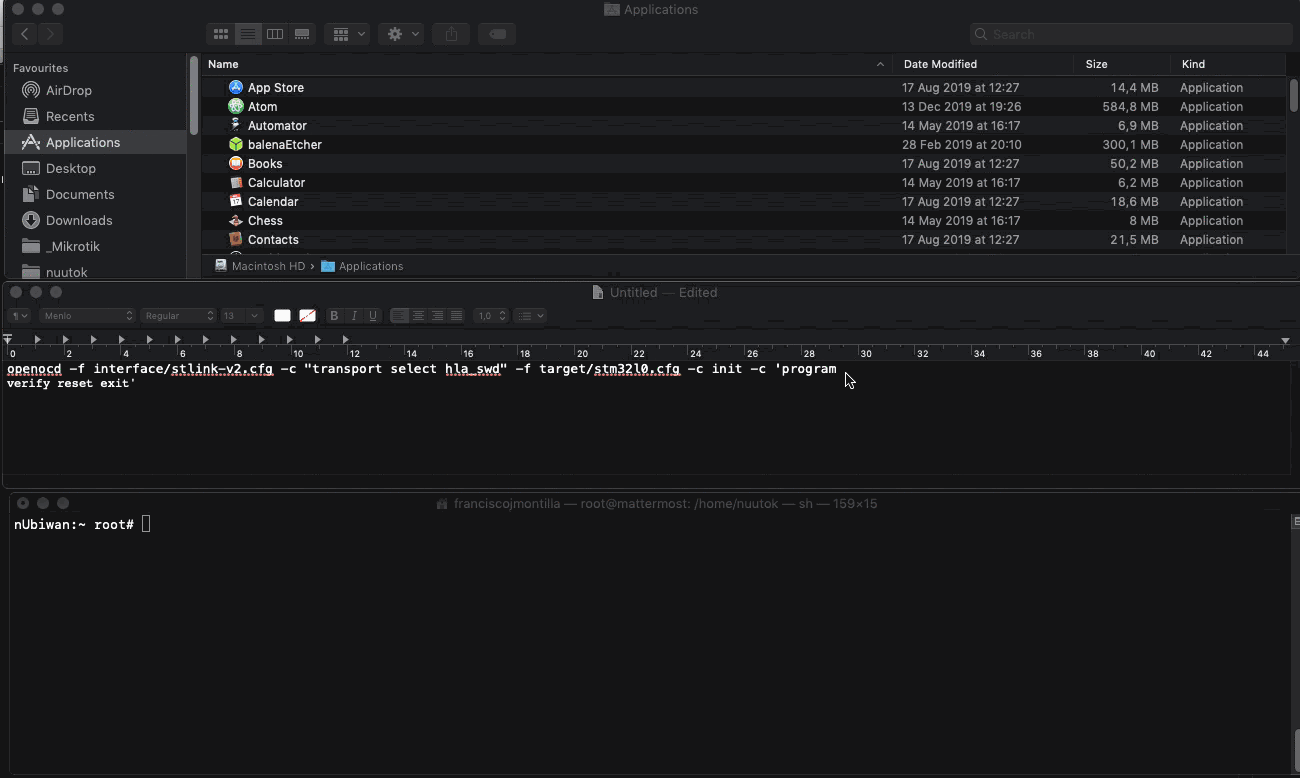
- 1.- Open Applications/Utilities/Terminal, and type the openocd command with the proper path for your firmware file location, but don’t press ENTER yet; e.g.:
openocd -f interface/stlink-v2.cfg -c "transport select hla_swd" -f target/stm32l0.cfg -c init -c 'program /Users/myusername/Documents/_LORA/DRAGINO/EU868.hex verify reset exit'
Example procedure to craft the openocd command line:
-
2.- Press and keep pressing reset button on LGT-92
-
3.- Press [ENTER] on the Terminal where openocd .... command is already typed
-
4.- Check ST-Link v2 LED, and release LGT-92 reset button as soon as it starts flashing red/blue
-
5.- Firmware flashing will start:
Kratos:~ root# openocd -f interface/stlink-v2.cfg -c "transport select hla_swd" -f target/stm32l0.cfg -c init -c 'program /Users/myusername/Documents/_LORA/DRAGINO/EU868.hex verify reset exit'
Open On-Chip Debugger 0.10.0
Licensed under GNU GPL v2
For bug reports, read
	http://openocd.org/doc/doxygen/bugs.html
hla_swd
adapter speed: 300 kHz
adapter_nsrst_delay: 100
Info : The selected transport took over low-level target control. The results might differ compared to plain JTAG/SWD
none separate
Info : Unable to match requested speed 300 kHz, using 240 kHz
Info : Unable to match requested speed 300 kHz, using 240 kHz
Info : clock speed 240 kHz
Info : STLINK v2 JTAG v31 API v2 SWIM v7 VID 0x0483 PID 0x3748
Info : using stlink api v2
Info : Target voltage: 3.224258
Info : stm32l0.cpu: hardware has 4 breakpoints, 2 watchpoints
Info : Unable to match requested speed 300 kHz, using 240 kHz
Info : Unable to match requested speed 300 kHz, using 240 kHz
adapter speed: 240 kHz
target halted due to debug-request, current mode: Thread
xPSR: 0xf1000000 pc: 0x080000d4 msp: 0x20002260
STM32L0: Enabling HSI16
Info : Unable to match requested speed 2500 kHz, using 1800 kHz
Info : Unable to match requested speed 2500 kHz, using 1800 kHz
adapter speed: 1800 kHz
** Programming Started **
auto erase enabled
Info : Device: STM32L0xx (Cat.5)
Info : STM32L flash has dual banks. Bank (0) size is 128kb, base address is 0x8000000
Warn : couldn't use loader, falling back to page memory writes
wrote 86016 bytes from file /Users/pacopepe/Documents/_LORA/DRAGINO/EU868.hex in 12.344066s (6.805 KiB/s)
** Programming Finished **
** Verify Started **
Error: JTAG failure
Error: Error setting register
target halted due to breakpoint, current mode: Handler HardFault
xPSR: 0x61000003 pc: 0x2000002e msp: 0x20002260
verified 84356 bytes in 0.451254s (182.556 KiB/s)
** Verified OK **
** Resetting Target **
Info : Unable to match requested speed 300 kHz, using 240 kHz
Info : Unable to match requested speed 300 kHz, using 240 kHz
adapter speed: 240 kHz
in procedure 'program'
in procedure 'reset' called at file "embedded:startup.tcl", line 529
in procedure 'ocd_bouncer'
3.3.- Reset to Factory Defaults
To finish the firmware upgrade:
AT+FDR^M
LGT-92 Device
Image Version: v1.5.3
LoRaWan Stack: DR-LWS-002
Frequency Band: EU868
DevEui= XX XX XX XX XX XX XX XX
Please set the parameters or reset Device to apply change
- 3.- Press reset button on LGT-92 if you want to keep EUIs etc:
LGT-92 Device
Image Version: v1.5.3
LoRaWan Stack: DR-LWS-002
Frequency Band: EU868
DevEui= XX XX XX XX XX XX XX XX

[2085]***** UpLinkCounter= 0 *****
[2485]TX on freq 868500000 Hz at DR 5
[2551]txDone
[7541]RX on freq 868500000 Hz at DR 5
[7625]rxDone
Rssi= -58
JOINED

Join Accept:
DevAddr:23 08 23 e0
Rx1DrOffset:0
Rx2Datarate:3
ReceiveDelay1:1000 ms
ReceiveDelay2:2000 ms

[19484]Roll=0.73  Pitch=-4.72
[19535]North: 37.408657
[19635]West: -6.164669
[19736]PDOP is 1.31
Yay! LGT-92 Successfully flashed using OS X to v1.5.3.
@dragino Feel free to include this in the manual.