Basics for setting up LoRaHAT/GPS on Raspberry Pi

I have read endless screeds of documentation that skips almost all the steps required to get a Dragino LoRaHAT working with TTN. Whole major important stages are just glossed over, like even which file to modify and how to edit it.

I am trying to get my Dragino LoRaHAT working. I had it working as a single channel gateway which took weeks of effort as all documentation is well out of date, especially with regard to screenshots from TTN on how to register a device. What is really needed is a single repository of this information that can be updated and maintained by interested users like me,

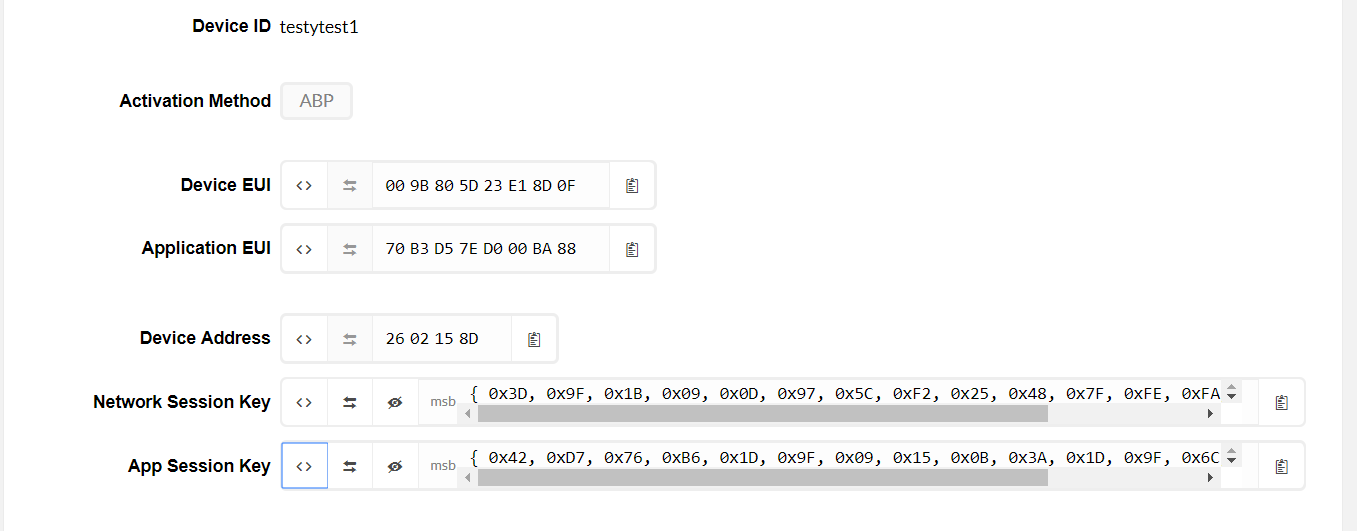
So right now I am trying to set up my LoRaHAT as a node. I am trying to use thethingsnetwork.send-v1 code.

Right away in http://wiki.dragino.com/index.php?title=Connect_to_TTN#Use_LoRa_GPS_HAT_and_RPi_3_as_LoRa_End_Device

at step 6 the instructions it asks you to “Setup your device”, thats the entire instruction and provides no information at all about how to do this.

I would suggest that at least the user is told to do:

cd lmic_pi-master/examples/thethingsnetwork-send-v1
sudo nano thethingsnetwork.send-v1.cpp

Then in that file there are the following lines of code:

// LoRaWAN Application identifier (AppEUI)
// Not used in this example
static const u1_t APPEUI[8]  = { 0x02, 0x00, 0x00, 0x00, 0x00, 0xEE, 0xFF, 0xC0 };

// LoRaWAN DevEUI, unique device ID (LSBF)
// Not used in this example
static const u1_t DEVEUI[8]  = { 0x42, 0x42, 0x45, 0x67, 0x89, 0xAB, 0xCD, 0xEF };

// LoRaWAN NwkSKey, network session key 
// Use this key for The Things Network
static const u1_t DEVKEY[16] = { 0x2B, 0x7E, 0x15, 0x16, 0x28, 0xAE, 0xD2, 0xA6, 0xAB, 0xF7, 0x15, 0x88, 0x09, 0xCF, 0x4F, 0x3C };

// LoRaWAN AppSKey, application session key
// Use this key to get your data decrypted by The Things Network
static const u1_t ARTKEY[16] = { 0x2B, 0x7E, 0x15, 0x16, 0x28, 0xAE, 0xD2, 0xA6, 0xAB, 0xF7, 0x15, 0x88, 0x09, 0xCF, 0x4F, 0x3C };

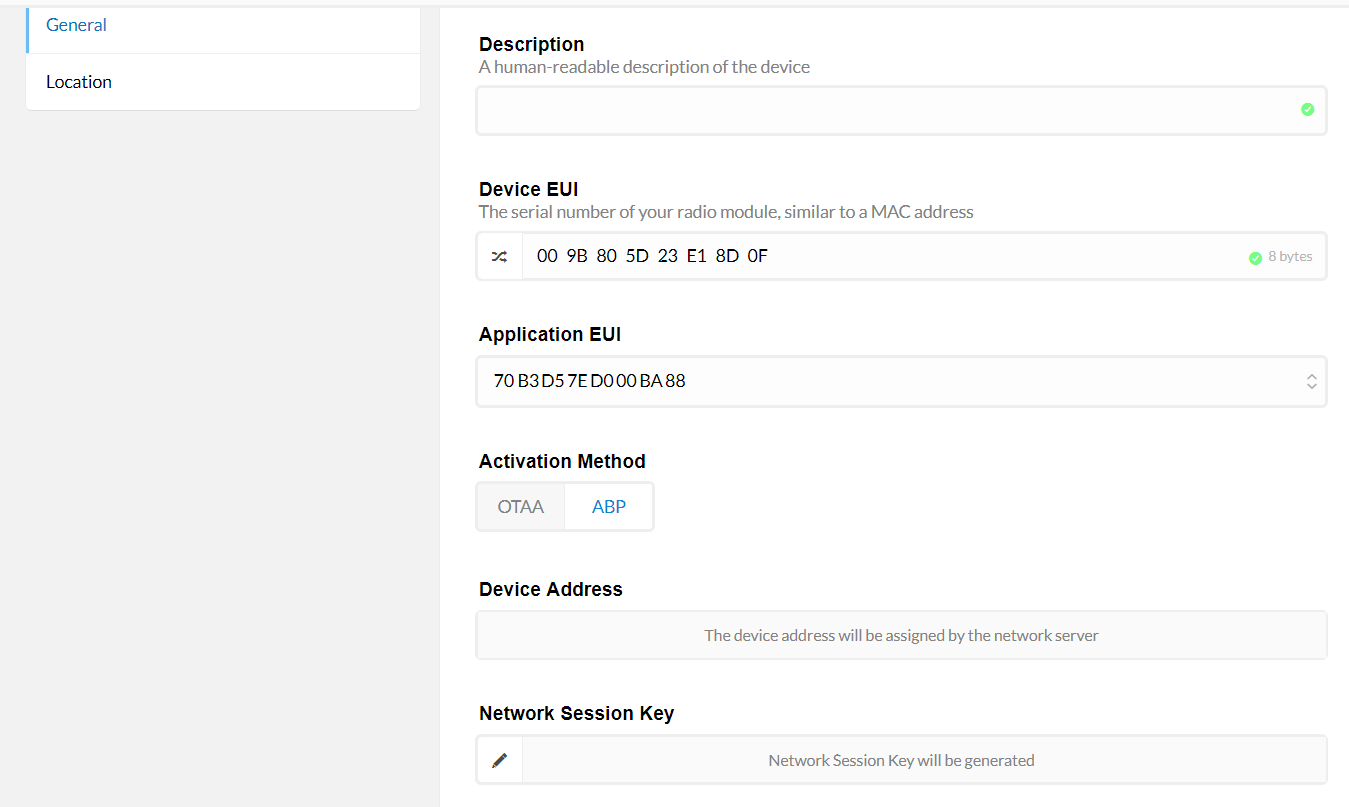
// LoRaWAN end-device address (DevAddr)
// See http://thethingsnetwork.org/wiki/AddressSpace
static const u4_t DEVADDR = 0xffffffff ; // <-- Change this address for every node!

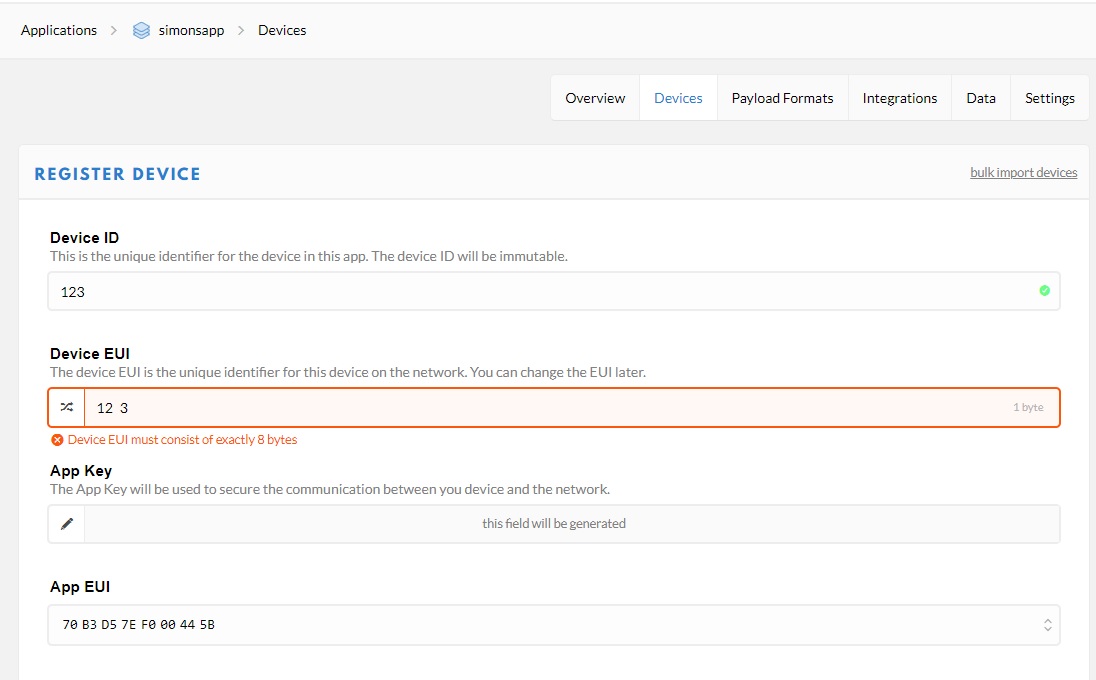
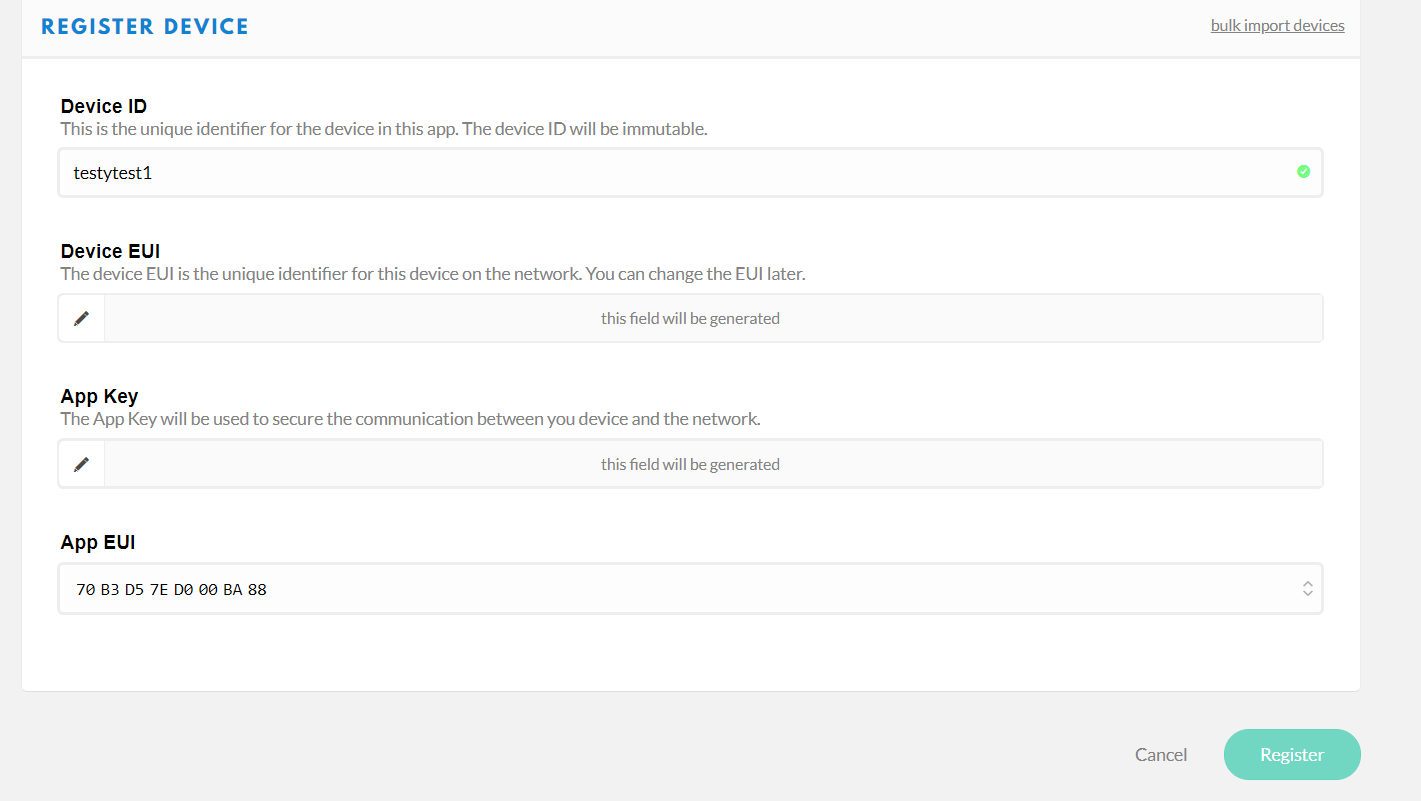
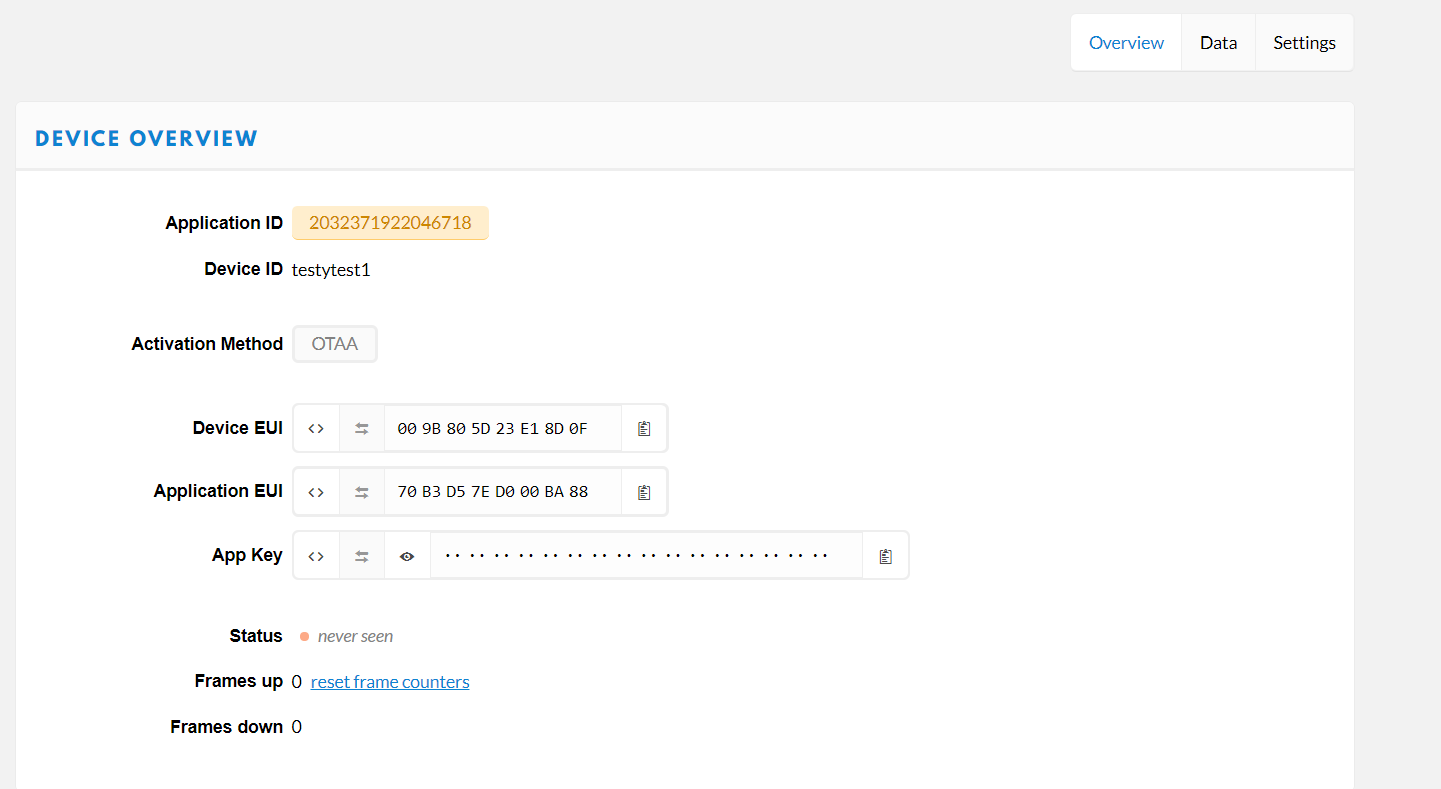
There is absolutely no information on how to set these values. Where on earth do I find the DevADDR?
The information on getting the AppSKey and NwkSKey from TTN is so out of date I couldn’t even follow it.

Do I create a new application first? Is the name important?
Where does one go to get all of this information?

Help please

Simon

1 Like

30 second google gave these links - hopefully useful to you

For setting up a LoraHat gateway
https://www.mobilefish.com/developer/lorawan/lorawan_quickguide_build_lora_gateway.html

Install and build the Single Channel LoRaWAN Gateway on your Raspberry Pi:

    Open a terminal on your Raspberry Pi.
    Create a directory, type: mkdir lorawan_gateway
    Goto the directory, type: cd lorawan_gateway
    Download the Single Channel LoRaWAN Gateway, type:
    git clone https://github.com/tftelkamp/single_chan_pkt_fwd.git
    Goto the sub directory, type: cd single_chan_pkt_fwd
    Edit file main.cpp, type:
    sudo nano main.cpp
    Make changes to the configuration according to your situation (look for: "Configure these values!") :

    /**************************************************************
     *
     * Configure these values!
     *
     *************************************************************/

    // SX1272 - Raspberry connections
    int ssPin = 6;
    int dio0  = 7;
    int RST   = 0;

    // Set spreading factor (SF7 - SF12)
    sf_t sf = SF7;

    // Set center frequency
    uint32_t  freq = 868100000; // in Mhz! (868.1)

    // Set location
    float lat=52.4518;
    float lon=4.8119;
    int   alt=10.0;

    /* Informal status fields */
    /* platform definition */
    static char platform[24]    = "Single Channel Gateway";
    /* used for contact email */
    static char email[40]       = "lorawan@mobilefish.com";
    /* used for free form description */
    static char description[64] = "Mobilefish.com LoraWAN Gateway";

    // define servers
    // The Things Network: router.eu.thethings.network
    #define SERVER1 "52.169.76.203"
    // The port on which to send data
    #define PORT 1700

    Write the changes to file, type: CTRL+O
    Exit the file: CTRL+X
    In the sub directory "single_chan_pkt_fwd" compile the code, type: make
    A packet forwarder executable file single_chan_pkt_fwd is created.

For setting up a Lorahat node

Device registration in TTN (use ABP)
https://www.thethingsnetwork.org/docs/devices/registration.html

Thanks CurlyWurly but maybe you missed the part of my message where I said I had set it up as a single channel packet forwarder successfully. I can also google for 30 seconds and am not a complete idiot.

I wanted instructions on setting it up as a node. That is where there doesn’t seem to be enough instructions.

Simon

2 Likes

The values that you are looking for are all on the Overview Page for the Device that you registered under your Application. If you already have an application created, and a device created you have access to this information in your account. Also you can always just create another device under your previously made application. The fourth photo under step 1 (http://wiki.dragino.com/images/thumb/4/49/TTN_Create_device_3.png/900px-TTN_Create_device_3.png) shows you exactly what you’re looking for on your own account. If you’re using ABP activation you already know that you only need the Network Session Key, the App Session Key, and the Device Address.

While I agree that some of the documentation from Dragino is lacking, out of date, or in some cases just incorrect this set of instructions doesn’t seem to be that bad in comparison. But that might just be my previous experience in programming these devices and also going through Dragino’s other walkthroughs. This could be slightly clearer and probably better organized which I will agree with you on.

If you would like anymore help feel free to ask.

Geof

Thanks Geof

so what is the Device Address? It seems that setting up a device wants you to enter the device address, which makes sense. It then issues the Network Session Key and App session Key. I just haven’t found any documentation that tells you where to find the device Address. Is there some magic Linux code that reveals it? A command line statement? Do I just make one up, if so, what format, string characters, or is it in hex, how many bytes…

thanks

Simon

pic1

As you can see it looks quite different than the image you hyperlinked too, and asks for a Device ID and a Device EUI. There doesn’t appear to be any documentation on how you are supposed to fill these two fields in. Can I just make up any stream of 8 bytes? How then does this actually link to my real device, i.e. how will it recognize it as the same device?

Simon,

The 30 second google was to say that there could be more info out there.

3 links were posted to you.
1st gives info about how to manipulate files (you did ask how to edit it - anyway, you’ve updated your post now, so clearly you now know how to do it)
2nd gives info about setting up a node (your main Q)
3rd gives info about how to register (Your q about the keys)

At the danger of you assuming you’re an idiot when people are trying to help you :slight_smile:
Have a look at this video from 8 mins on. It answers a lot of questions that you are probably going to ask - N.B. I can’t remember if it is LSB or MSB and video may be slightly out of date so be prepared to deal with some ambiguity without getting angry about it

The Device Address should be created for you as well. When I went to just register a device the only piece of information that I needed to put in was the Device ID which is different from the Device Address. After you register the device you’d then go into the settings and change the activation method to ABP. You should then see that the Device Address, Network Session Key, and App session key will be generated. After you save the new setting(s), you’ll be back at the Device Overview page where it will display that info for you.

Also a side note if you do want a random hexidecimal value generated you can use the following command in a terminal

openssl rand -hex 8

Where the 8 is length in bytes that want generated. This also requires you to have openssl installed but there are other ways to generate a random code as well.

Also sorry, I read through your last response quickly and I just wanted to make sure I was more clear. The image you show is just from the first page of the registration process. As I mentioned in my previous post you only really need to fill in the Device ID. Device EUI can be generated by TTN just by clicking on the button on the left side of the field to toggle it from User Generated to TTN Generated (See Picture 1). After you select an ID and if you choose to, let TTN create the Device EUI, hit the register button. This will bring you up to your Device Overview window (see picture 2). You are then going to want to click on the Settings button in the upper right, which will bring you to a new screen where you’ll see something like in my 3 picture. You will want to select ABP, as my picture is already from after I’ve done that. You should now see the options for a Device Address, and the two Keys are listed and they will be generated for you, so after selecting ABP all you have to do is hit save at the bottom of the window. This will bring you back to the Device Overview page which then shows you all three bits of information that you need for you code. Please see my 4th picture to verify that what you are seeing is what I do aside from the the keys and ID being different and this should look like the photo that I posted in my first response if all has gone well. Also note that by default the keys are hidden so you’ll need to click on <> button to switch between the hiding and showing the keys in their two formats. For your code you’re going to want the preformatted keys in curly braces {}.

(1) reg1
(2)reg2
(3)reg3
(4)reg4

1 Like

So I just create a random 8 hex character Device ID and then everything else is created by TTN. I then copy the created values into the thethingsnetwork.send-v1.cpp file.

I note it says that DEV EUI and APP EUI are not used.

Thanks, will try tomorrow

Simon

The ID you pick doesn’t need to be in hexadecimal. It just needs to be lowercase and one word. Like in my example I gave my new devices the id/name testytest1. Hope your attempt today works out.

I have successfully modified both
thethingsnetwork.send-v1.cpp

and

config.h (from the LMIC library installed at /home/pi/lmic_pi-master/lmic) to use 915 frequency

I started the application

sudo ./thethingsnetwork-send-v1

and it reported

[894] (1525493216) Sat May  5 04:06:56 2018

2203: freq=902300000
Event EV_TXCOMPLETE, time: 2
[62334] (1525493236) Sat May  5 04:07:16 2018

402232: freq=902300000
Event EV_TXCOMPLETE, time: 22
[c3dd1] (1525493256) Sat May  5 04:07:36 2018

802261: freq=902300000
OhOh. Unknown interrupt flags for FSK
FAILURE
radio.c:629

Note the frequency is definitely wrong for AU915. So after a bit of googling I saw the frequencies are stored in lorabase.h
So I changed the frequency plan to:

// Default frequency plan for US 915MHz
enum { US915_125kHz_UPFBASE = 916800000,
       US915_125kHz_UPFSTEP =    200000,
       US915_500kHz_UPFBASE = 917500000,
       US915_500kHz_UPFSTEP =   1600000,
       US915_500kHz_DNFBASE = 923300000,
       US915_500kHz_DNFSTEP =    600000

and recompiled and started the app, Now it reports:

[5224] (1525494942) Sat May  5 04:35:42 2018

21035: freq=916800000
OhOh. Unknown interrupt flags for FSK
FAILURE
radio.c:629

and I get one message on my gateway. So it works once and once only. No amount of googling will tell me what the error radio.c :629 means

help please

Simon

Fixed it, I also had to change the minimum frequency on the next two lines:

enum { US915_FREQ_MIN = 916800000,
       US915_FREQ_MAX = 928000000 };

I figured out that radio.c:629 was simply that it had failed at line 629 in that module.

2 Likes

Thanks smbunn. I found this helpful. Any chance you have tried getting this to work with OTAA?

I agree with @smbunn that the documentation is really lacking. Which I personally find a bit disappointing, as the Dragino seems to be a really nice device. It took me days to setup the Dragino Lora Hat on my Raspberry and finally get it to work. Yes, you find endless amounts of documents on Google, but also lots of it is outdated or “not maintained anymore”. And you wonder which git repository to use.

Anyway, I am also looking for a nice example for the Raspberry as a node sending data via LoRaWAN to TTN. The Dragino Hat has a GPS sensor included, it would be cool to just send the current position every minute to TTN while driving through the country to be able to check the coverage of gateways. And I wouldn’t even mind another programming language like python or node.

1 Like

I am also getting erratic failures when running ‘./thethingsnetwork-send-v1’:

Sometimes

FAILURE
lmic.c:1759

but more often

FAILURE
radio.c:629

This is exactly what I use my Dragino hat for by using the on board GPS. lmic-rpi-lora-gps-hat/examples/ttn-mapper/main.c at master ¡ maxious/lmic-rpi-lora-gps-hat ¡ GitHub is the program which works with the http://ttnmapper.org integration

I also recently discovered you can load GPS assistance data from the internet to the Quectel L80 chip to get a faster location lock with GitHub - gtjoseph/mt3339-utils

6 Likes

Finally, I got this working with thethingsnetwork-send-v1. But actually, my task is to turn on an LED when a special word is received. How can I modify this to receive messages? Or is there a thethingsnetwork-receive-v1 ? And is there a way to work with Raspberry’s LEDs/GPIOs out of this C code?

2 posts were merged into an existing topic: Sending Customized Data

so what was fix and is it possible to.connect dragino lorawan hat to tnn directly without gateway