USE CASE
Measure and report LoRa’s enclosure temperate and humidity.
DEVICE
Outdoor LoRa Gateway in hermetic plastic enclosure.
ENCLOUSURE
ABS IP65 240x190x90mm
ENCLOUSURE ACTIVE CONTENT
Raspberry Pi 2 Model B running OS Debian 10 (Buster)
iC880A-SPI Concentrator
IKEA Koppla: 2A 1-USB port charger
ENCLOUSURE PASSIVE COMPONENTS
1/4 Wave Ground Plane Antenna:
- Rods material: aluminium
- RF Connector: SMA Female, ST, 4 Hole Flange, 14MM Extended Teflon, Round Post
- Cone/Holder: Radial antenna mount cone by Tamadite - Thingiverse
- 10cm x ø40mm PVC pipe
- Cable patch: RG-58 with SMA-male connectors
Raspberry/Concentrator common holder:
Schuko socket
Two silica desiccant packs
UV-Resistant Cat6 cable
Diverse screws
USE CASE COMPONENTS
DHT-11
10K Ohms resistor (SMD 103)
3pcs 10cm Dupont cable
SOFTWARE COMPONENTS
R-Pi on Raspbian GNU/Linux 10 (buster)
io.adafruit.com → external MQTT broker
Python 3 library
RATIONAL
I had concerns about the temperature and humidity inside the enclosure. High temperatures may lead to shorten the operative live of the solution. A water leak would definitively lead to dramatic consequences in a short period of time. Having a temperature/humidity sensor inside the enclosure would help monitoring the temperate and so planning for alternative solutions if ever. An increase in humidity level would indicate a possible water leak. These two values are to be constantly monitored with threshold alarms triggering automatic notifications.
DHT-11 and 10K resistor
I decided to open the DHT-11 case and solder a SMD 10k resistor (103) between legs 1 and 2 viewed from the front side. I got the SMD resistor from my e-waste.
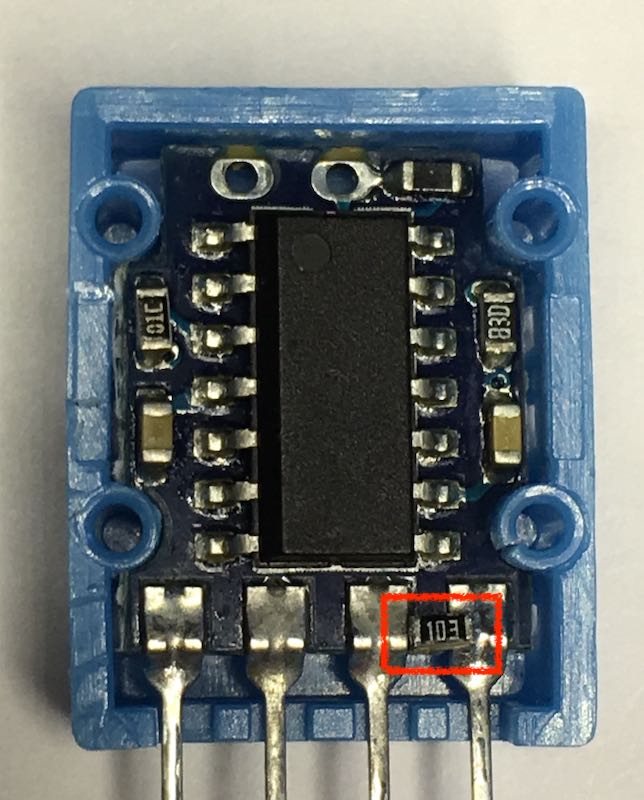
Arranged DHT11 with internal SMD 10K. Note back side view!
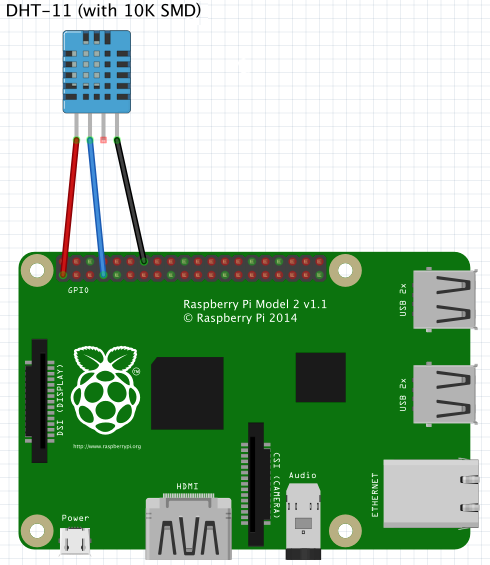
Connect the DHT11 with SMD to the R-Pi according to picture below.
Sensor Vcc+ to Raspberry Pi 5V
Sensor GND to Raspberry Pi GND
Sensor Signal to Raspberry Pi PIN 7 (GPIO PIN 4)
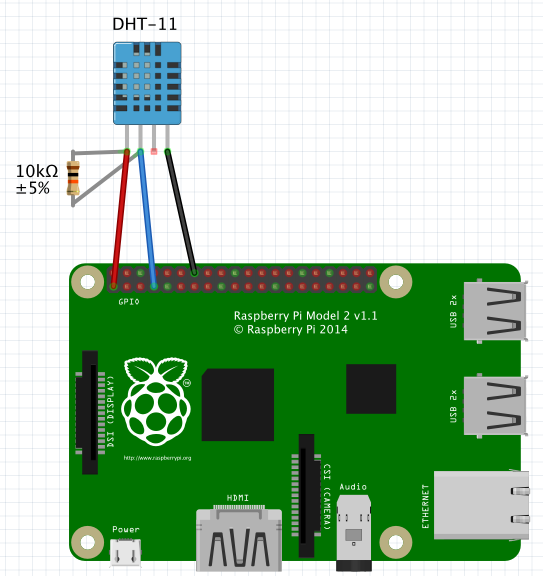
DHT11 with external 10K to Raspberry.
Connect the DHT11 and the 10K Ohms resistor to the R-Pi according to picture below. Same pinout as above.
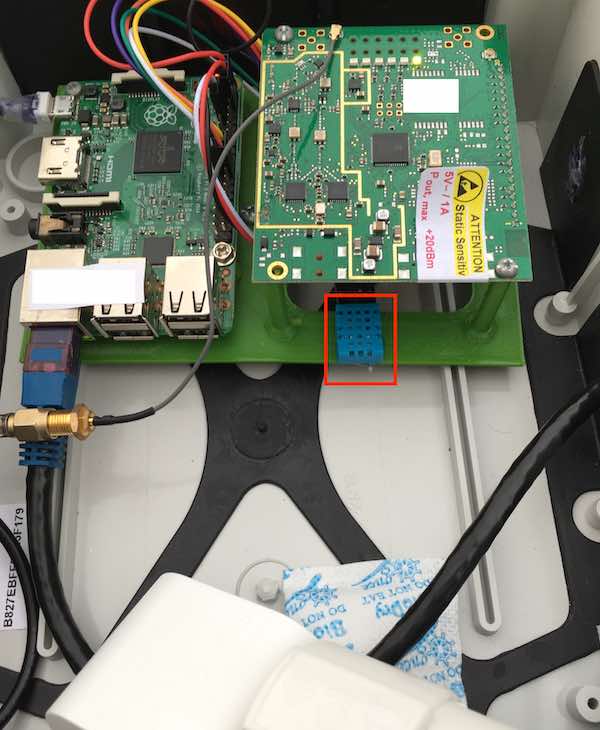
My enclosure inside:
Let’s install the necessary packages:
sudo apt-get update
sudo apt-get install python3-pip
sudo pip3 install Adafruit_DHT
sudo apt-get install python3-dev python3-pip
sudo python3 -m pip install --upgrade pip setuptools wheel
Now create the following file:
sudo nano loragwdht11.py
and paste the following content:
import Adafruit_DHT
import time

DHT_SENSOR = Adafruit_DHT.DHT11
DHT_PIN = 4

while True:
    humidity, temperature = Adafruit_DHT.read(DHT_SENSOR, DHT_PIN)
    if humidity is not None and temperature is not None:
        print("Temp={0:0.1f}C Humidity={1:0.1f}%".format(temperature, humidity))
    else:
        print("Sensor failure. Check wiring.");
    time.sleep(3);
Let’s save the file and close the editor by doing
Ctrl+x
Let’s execute the code to check the sensor works:
sudo python3 loragwdht11.py
You should get something similar to this every three seconds, but possibly with other values:
Temp=20.0C Humidity=21.0%
Temp=20.0C Humidity=21.0%
Temp=20.0C Humidity=21.0%
Should you get
Sensor failure. Check wiring.
then do as advised.
Now that we have confirmed the sensor works let’s continue with MQTT.
Go to io.adafruit.com and create two feeds, one for temperature and one for humidity. Let’s assume the feeds are:
[YourUsername]/feeds/gwtemperature
[YourUsername]/feeds/gwhumidity
Let’s create the file that is to contain the Python code that is to transmit the values to the Adafruit broker:
sudo nano loragwdht11.py
paste the following lines into it:
import Adafruit_DHT
import time

from Adafruit_IO import Client, Feed

ADAFRUIT_IO_KEY = ’YourAdafruitKey’
ADAFRUIT_IO_USERNAME = ’YourUsername’

DHT_SENSOR = Adafruit_DHT.DHT11
DHT_PIN = 4

aio = Client(ADAFRUIT_IO_USERNAME, ADAFRUIT_IO_KEY)

while True:
    humidity, temperature = Adafruit_DHT.read(DHT_SENSOR, DHT_PIN)
    if humidity is not None and temperature is not None:
        aio.send_data(’gwtemperature’, temperature)
        aio.send_data(’gwhumidity', humidity)
    time.sleep(60);
Now we want to run this code in the background (daemon) and also launch it in every boot.
Create a new file as follows:
sudo nano/lib/systems/system/loragwdht11.service
and paste the following:
[Unit]
Description=Sending temp and humi to Adafruit broker (io.adafruit.com)
After=multi-user.target

[Service]
Type=simple
ExecStart=/usr/bin/python3 /home/ttn/loragwdht11.py

[Install]
WantedBy=multi-user.target
Close the file and run the following commands:
sudo systemctl daemon-reload
sudo systemctl enable loragwdht11.service
Now let’s start the service:
sudo systemctl start loragwdht11.service
Let’s check the status of the service:
sudo systemctl status loragwdht11.service
Among the all information you are to get, you should be able to see ”Active: active (running)”
Remember to execute the following every time you modify loragwdht11.service
sudo systemctl daemon-reload
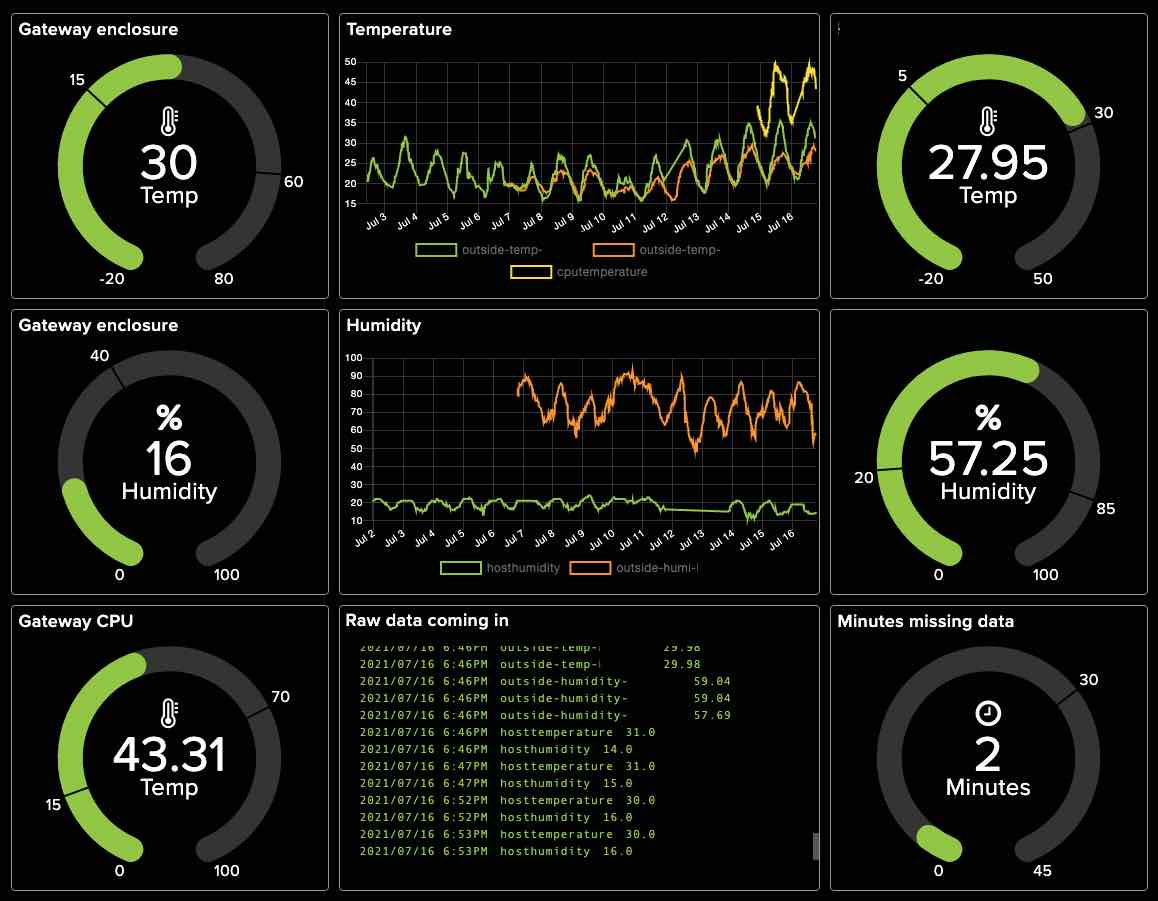
My Adafruit dashboard: