Greetings from Nicaragua. Caould you please comment how it is going? Have you made a signal plot or new drive testing? Are you using some specific SW? Thanks for share.
Marcelo
Thank you and Greetings from Brazil !!
The network is running full steam!
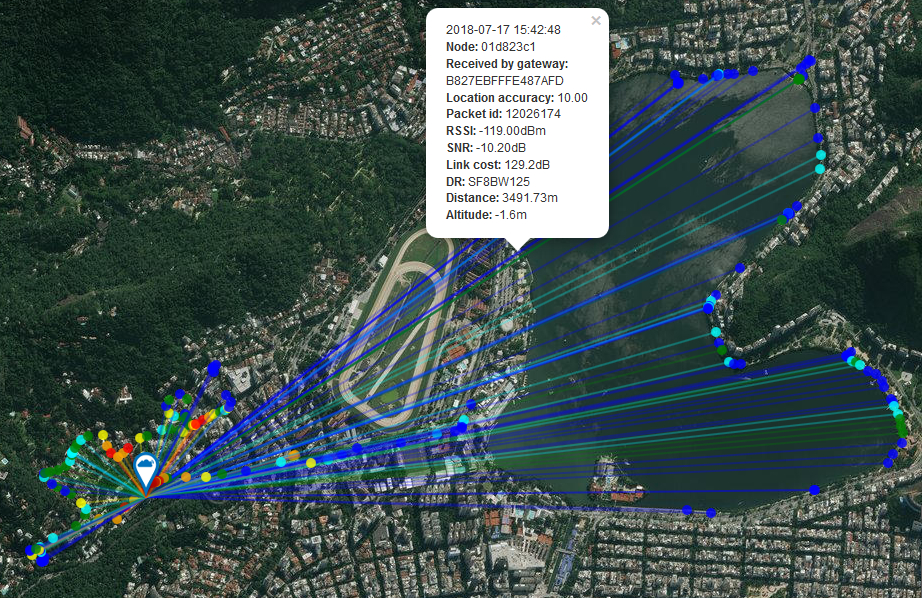
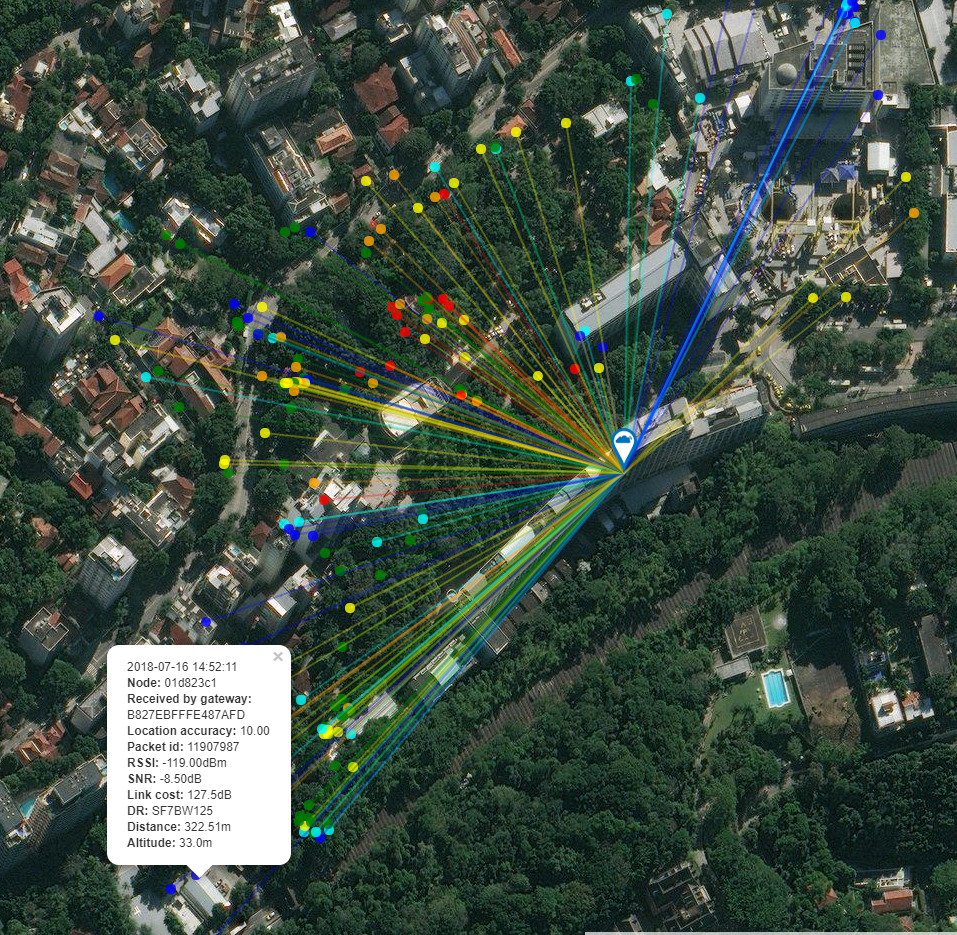
Yes I did a new test drive with the mapping of all the points that can be covered on the PUC campus and throughout the Gávea neighborhood, Jardim Botanico and Lagoa Rodrigo de Freitas.
For mapping I use the own TTNMAPPER
To display the Graphics I use the Ubidots Platform.
4 Likes
Hi Marcelo! Greetings from Sicily! Thank you for sharing your work. I’m also interested in your mobile equipment you’re using to map the coverage of your gateway.
Best,
Luca
1 Like
Hello,
So I use a module of the seeeduino and a cell phone with GPS galaxy S9 together to carry out the measurements.
While the seeeduino sends a payload with temperature and humidity I use the cellular in conjunction with the TTN MAPPER to confirm the sending of the payload to the network of the TTN and thus to record and to plot the GPS information.
1 Like
Hi Marcelo
That’s brilliant. I’m really impressed with the self-built gateway and the data visualisation you have used. I’m just starting with LoRaWAN and took the easy way out of buying an off-the-shelf gateway. It’s only indoors but I needed a quick way to provide coverage for some project students.
Best wishes and greetings from the UK
Tim.
1 Like
Thank you so much Marcelo. I’m at the very begin with this kind of prototypigng, so sorry if I ask you something more about your gateway… (please tell my if I’m asking too much).
In checking your device list, and matching it with the picture you’ve posted, I can’t identify the device placed on the botto-left corner of the enclosure.
Please: what it is used for?
In any case (hope this can be useful for others beginners) I’ve tried to list all the main options available to power the gateway (mainly the Raspberry board), assuming PoE (and then, assuming a PoE switch port or a PoE injector is placed downstream):
- using a PoE splitter with micro-usb connector (then powering RB through his micro-usb port);
- using a PoE splitter with a DC output (like yours I suppose) and a Lm 2596 Step-down DC/DC voltage regulator (Q: is it mandatory / recommended also when the PoE splitter ensures you a compliant DC output?)
- using a Raspberry Official PeO HAT that allows you to avoid any external splitter, given that with this HAT you can put the RJ-45 PoE cable directly into the Rasberry port
Please Marcelo, assuming the target is to do exactly the same experiment you did:
based on your experience / opinion, and putting apart any cost issues, what is in your opinion the best choice among the three?
And, as the last request (sorry): please can you give some suggestions or post some link that explain how to build the mobile equipment (based on seeeduino, also available online in a version with lorawan protocoll and gps embedded https://m.seeedstudio.com/productDetail/2781)?
Thank you so much, and have great days…
Luca
3 Likes
Greetings from New Zealand. You have a very impressive setup, it looks great and well thought out.
We have recently started up in Christchurch and will be keeping an eye on your setup and any future projects you work on.
Cheers
Saul
1 Like
With TTN Mapper (sorry, I edited the mistake)you can use any node sending anything, accompanied by a mobile phone with the TTN Mapper app, and integration with TTN in the console. When you want to map, you start the app, and at any time the node is received by some gateway, the phone is notified and records the location. So no need for GPS chip on the node.
By the way, congratulations to Marcelo ![]() . Bike is also a sensible choice, because in car over 40km/h SF12 is not always functioning.
. Bike is also a sensible choice, because in car over 40km/h SF12 is not always functioning.
1 Like
In the above post I just corrected a mistake (thought TTNMapper, written TTN). Apologies 
Thank you!
You can ask at will !! I’m just sorry if I’m slow to respond.
The device is an old GPS module that I had saved. I just do not remember the model, but I already say that it is Motorola.
I use a PoE source to power my device. In the case of the plug poe I use it inverted.
The PoE cable goes into the LAN and the data goes out into the PoE and feeds a voltage regulator. With the voltage regulator I go from 24V to 5V and feed the concentrator IMST and Raspberry. Note that the poe connector has a font connector on it. This is where the power goes out to power the voltage regulator. Like I said, I use it the inverted PoE connector.
In my opinion the best is the HAT PoE for raspberry. But in the IMST documentation he asks to feed separately.
I advise you to see this link here because I describe the project I am developing. He is also here from the TTN forum. If you do not respond to your response please let me know that I will try to be as clear as possible.
https://www.thethingsnetwork.org/forum/t/mapping-of-iot-lora-network-coverage-at-puc-campus-and-the-first-prototype-of-temperature-and-humidity-sensor/ 15974
This code is what I used to program the seeeduino to measure temperature and humidity and send the data to the TTN network.
#include <TheThingsNetwork.h>
#include <LoRaWan.h>
#include “DHT.h”
#define DHTPIN 7
#define DHTTYPE DHT22
DHT dht(DHTPIN, DHTTYPE);
unsigned char data[4];
char buffer[256];
void setup(void)
{
dht.begin();
lora.init();
memset(buffer, 0, 256);
lora.getVersion(buffer, 256, 1);
SerialUSB.print(buffer);
memset(buffer, 0, 256);
lora.getId(buffer, 256, 1);
SerialUSB.print(buffer);
lora.setId("XXXXXXXXXXXXX", "XXXXXXXXXXX","XXXXXXXXXXXXXXXX" );
lora.setKey(NULL, NULL, "XXXXXXXXXXXXXXXXXXXXXXXXXXXX");
lora.setDeciveMode(LWOTAA);
lora.setDataRate(DR5, EU868);
lora.setAdaptiveDataRate(true);
lora.setChannel(0, 868.1);
lora.setChannel(1, 868.3);
lora.setChannel(2, 868.5);
lora.setChannel(3, 867.1);
lora.setChannel(4, 867.3);
lora.setChannel(5, 867.5);
lora.setChannel(6, 867.7);
lora.setReceiceWindowFirst(1, 868.3);
lora.setReceiceWindowSecond(869.525, DR0);
lora.setPower(14);
while(!lora.setOTAAJoin(JOIN));
}
void loop(void)
{
bool result = false;
delay(2000);
SerialUSB.println("-- LOOP");
// Aqui esta lendo o dado do sensor e multiplicando por 100 para tornar o envio eficiente com 2 decimais
// Lendo a umidade do sensor
uint32_t humidity = dht.readHumidity(false) * 100;
// Lendo a temperatura do sensor / Valor falso (false) para Celsius e Verdadeiro (true) para Farenheit
uint32_t temperature = dht.readTemperature(false) * 100;
// Dividindo em 2 palavras (32 bits) para dois bytes de 16
byte payload[4];
payload[0] = highByte(temperature);
payload[1] = lowByte(temperature);
payload[2] = highByte(humidity);
payload[3] = lowByte(humidity);
// Exibir no terminal serial a Temperatura e Umidade lida do sensor
SerialUSB.print("Temperatura: ");
SerialUSB.println(temperature);
SerialUSB.print("Umidade: ");
SerialUSB.println(humidity);
// Nesta parte abaixo a função transfer packet pega o dado do payload o prepara para enviar via rede LoRa
result = lora.transferPacket(payload, 4, 10);
if(result)
{
short length;

short rssi;

memset(buffer, 0, 256);

length = lora.receivePacket(buffer, 256, &rssi);

if(length)

{

    SerialUSB.print("Length is: ");

    SerialUSB.println(length);

    SerialUSB.print("RSSI is: ");

    SerialUSB.println(rssi);

    SerialUSB.print("Data is: ");

    for(unsigned char i = 0; i < length; i ++)

    {

        SerialUSB.print("0x");

        SerialUSB.print(buffer[i], HEX);

        SerialUSB.print(" ");

    }

    SerialUSB.println();

}
}
delay(5000);
}
Decoder on TTN
// Decodificação do payload no tttn
function Decoder(bytes, port) {
var humidity = (bytes[0]<< 8) | bytes[1];
var temperature = (bytes[2] <<8) | bytes[3];
return {
humidity: Umidade,
temperature: Temperatura
}
}
Mapa de minha rede
https://ttnmapper.org/special.php?node=01d823c1&date=2018-07-17&gateways=on
TTN APP Android
https://play.google.com/store/apps/details?id=org.ttnmapper.phonesurveyor
1 Like
Thank you very much Marcelo and UdLoRa!!!
I’m going on with my study finalized to write the corret buy list of all the devices and accesories for my first LoRaWAN Gateway and a single Test Node.
Please, here some other question based in yours latest answer (you are so patient, thank you, and don’t worry about your time-to-answer  ):
):
-
Motorola GPS device. Ok, thank you. But, sorry, I never hear about necessity to install a GPS module inside the gateway… is it mandatory? what is used for? (I imagine, since the position of the gateway is fixed, that you can specify the GPS coordinates via the gateway software once at the first installation and then modify them if the position of the gateway change over time).
-
PoE HAT. So, IMST require a separate feed for the concentrator, I understand. And indeed I’ve found this scheme from iC880A-SPI QuickStart Guide:
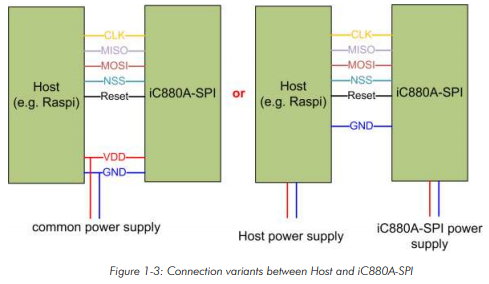
and the textual raccomandation: “The power pins (21, 22) have to be connected to a proper power supply that is able to provide more then 700mA. Therefore is recommended to choose a proper power supply the iC880A-SPI and the host system at the same time”.
So, since I would like to use the PoE HAT, I’ll go in deep with IMST / Raspberry Support channels to understand if the RB PoE HAT can provide, indirectly, such a power “on cascade”. I’ll report on that. -
Node. I’ve checked your picture of the mobile node. I’ve understand that (differently than if I had use a normal Ardunio, using a Seeeduino LoRaWAN let me avoid to buy a separte communication module, since it embedd a RHF76-052AM module). But, please, let me clarify the question about the Seeeduino LoRaWAN W/GPS version (that cost only 10$ more then the normal version). If I have a GPS module inside the node, I suppose that I can set the node, not (or not only) to send to the network data like temperature, but to send also the GPS Coordinates themselves. So my question is: can I do a coverage mapping in “unattended mode”: as an example: I ask to a friend of mine to go with his bike and a Seeeduino LoRaWAN W/GPS node aroung the neighborhood of my gateway, without a phone (possibly I set the node to send a payload every 5/10 minute or so). In the meantime I use a PC with the “web version” of the TTN Mapper in which I “translate” the data coming from the node (the GPS coordinates and other network data) into the map. Is it possible?
Other question on SF12 and the speed of the veicle hosting a node, next time…
Have a good Life
A thanks again…
Luca
1 Like
TTN Mapper allows also to send coordinates directly from the node, following a specific format. Check on the FAQ (Section “How can I contribute”) for specifications: https://ttnmapper.org/faq.php
1 Like
Thank you so much! Have a nice day…
I again Marcelo, hope you´re doing well.
Have you made some comparison of measured level of signals, bit rate, errors, etc. vs theoretical values (in case you have done some preliminar analysis) In such case, could you please share SW version or tool used?
Thanks again, and have a Great 2019!
Marcelo - Managua, Nicaragua
Hello, sorry for taking so long to respond!
I have not done these types of tests yet. I even focused on the coverage and physical assembly of the gateway.
This year 2019 will be the year that I will be performing more specific tests like measured level of signals, bit rate, errors, etc.
Happy 2019!!
1 Like
It is not required because you can add the location with fictitious GPS data. You can change the position and GPS data without problems.
About energy I followed the manufacturer’s recommendation
If you have information from IMST about direct power supply from Raspberry you could let me know so I could try it as well.
Of course it is possible, in my case I wanted to do as fast as possible and as I had the phone in hand and internet access I found it easier. But nothing prevents you from having your code post GPS data and temperature measurements. If you can, please, if possible, share your code.
Another question about SF12 and the speed of the vehicular hosting a node, the next time …
I intend to test with a vehicle that we have here in PUC and increase the speed.
My bike is electric and it has an average speed of 25km per hour. The spreed factor I left the ADR enabled as well so it if the just what the best SF it will use for the transmissions.
Thank you, I say!
The more questions you have, the better it is so that I can improve my work with the doubts of others that are coming up.
Thank you!
Keep in mind: ADR only works for stationary nodes. When a node is moving the network will not be able to calculate correct values for the node. Any value calculated by the network might result in the node transmitting at a spreading factor and power that is inappropriate for the next location (and will result in packet loss).
Thanks Marcelo, hope all is running very fine!
hello marcelo
i am name is david mbemba student at tut in south africa , am right now busy to do the implementation of lorawan in agriculture but am relly stuck abiut how to set up my gateway am using the seeeduino lorawan kit (http://wiki.seeedstudio.com/LoRa_LoRaWan_Gateway_Kit/#faqs)…please i need help