Node-RED has built-in support to act as an MQTT client, which can be used with TTN’s MQTT Data API.
For new developments, one should not use the The Things Network’s node-red-contrib-ttn, which is no longer supported.
Setting up the MQTT client
The following may seem a lot of steps, but Node-RED will guide one through the initial setup. For the current version V2 as used on the TTN community network:
-
Drop an “mqtt in” node on your flow:
-
Double-click it:
-
Topic: e.g.,
+/devices/+/upfor the uplinks of all devices in your application -
Output: “a parsed JSON object” (if you’re using an old version of Node-RED then use its default)
-
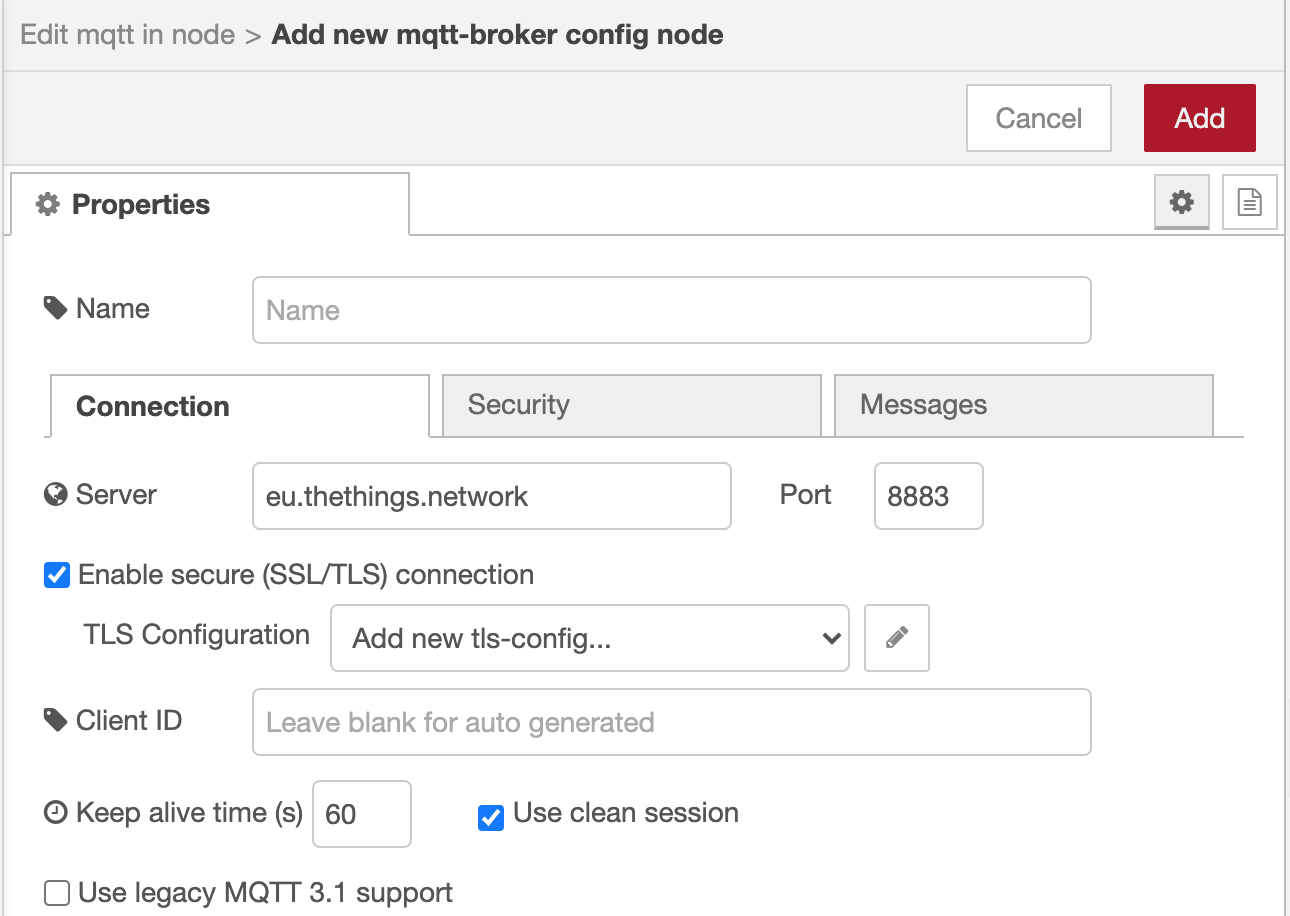
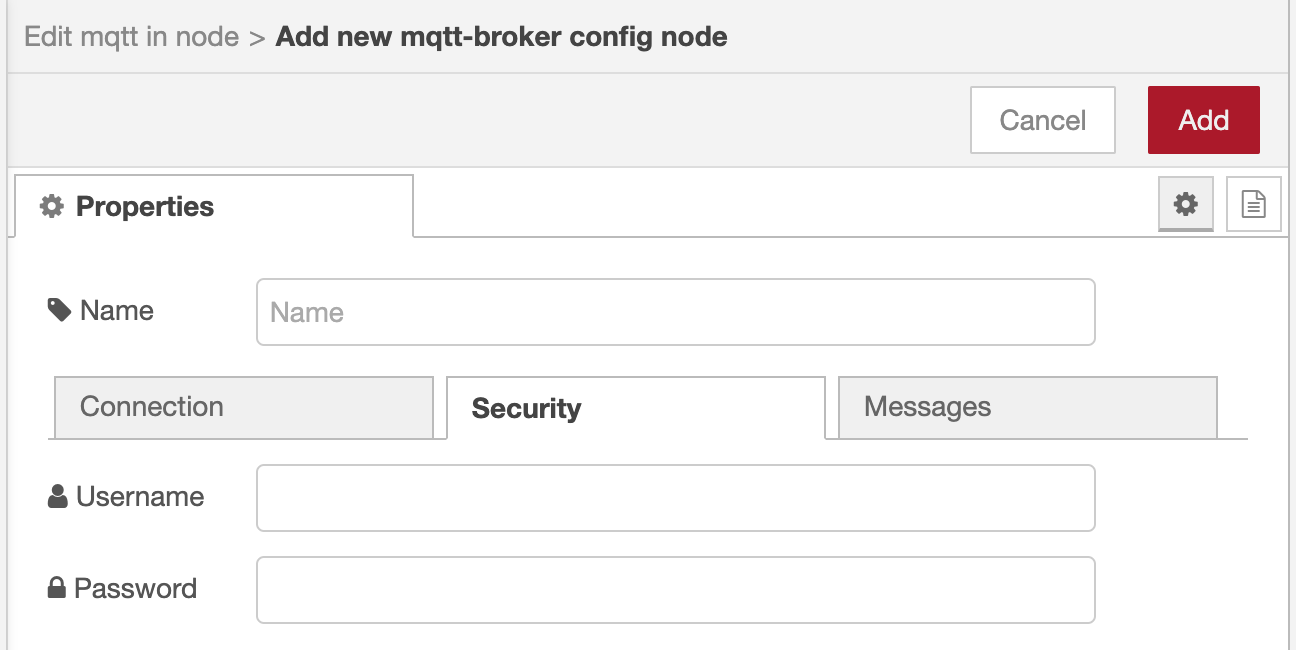
Server: select “Add new mqtt-broker…” and click the pencil icon:
-
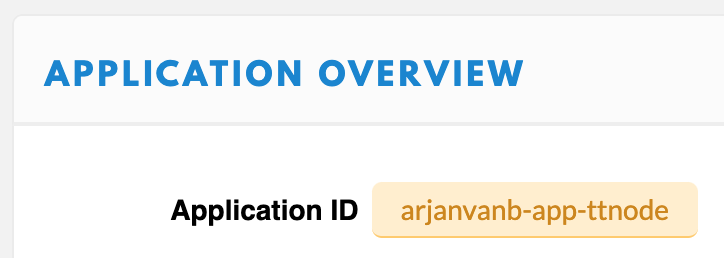
Name: e.g. your application id from TTN Console (the default name would be the server name, but the configuration is only valid for a single application; seeing only the server name may be confusing if you set up flows for multiple TTN applications)
-
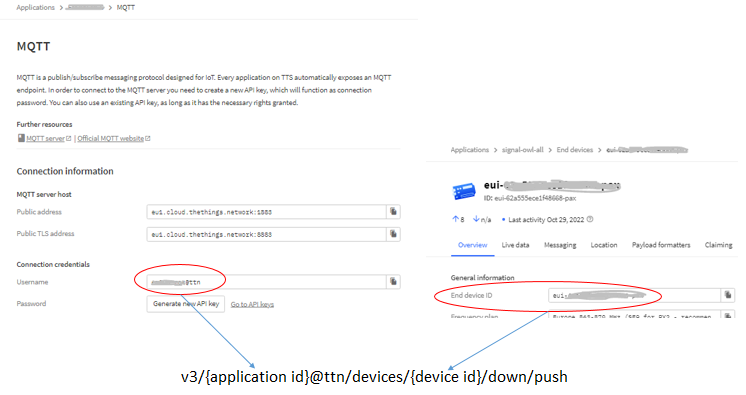
Server: e.g.,
eu.thethings.network(in your application in TTN Console, the suffix from, e.g.,ttn-handler-eudefines the prefix needed in the server URL) -
Port: 8883 (the default 1883 is for non-TLS)
-
Select “Enable secure (SSL/TLS) connection”
-
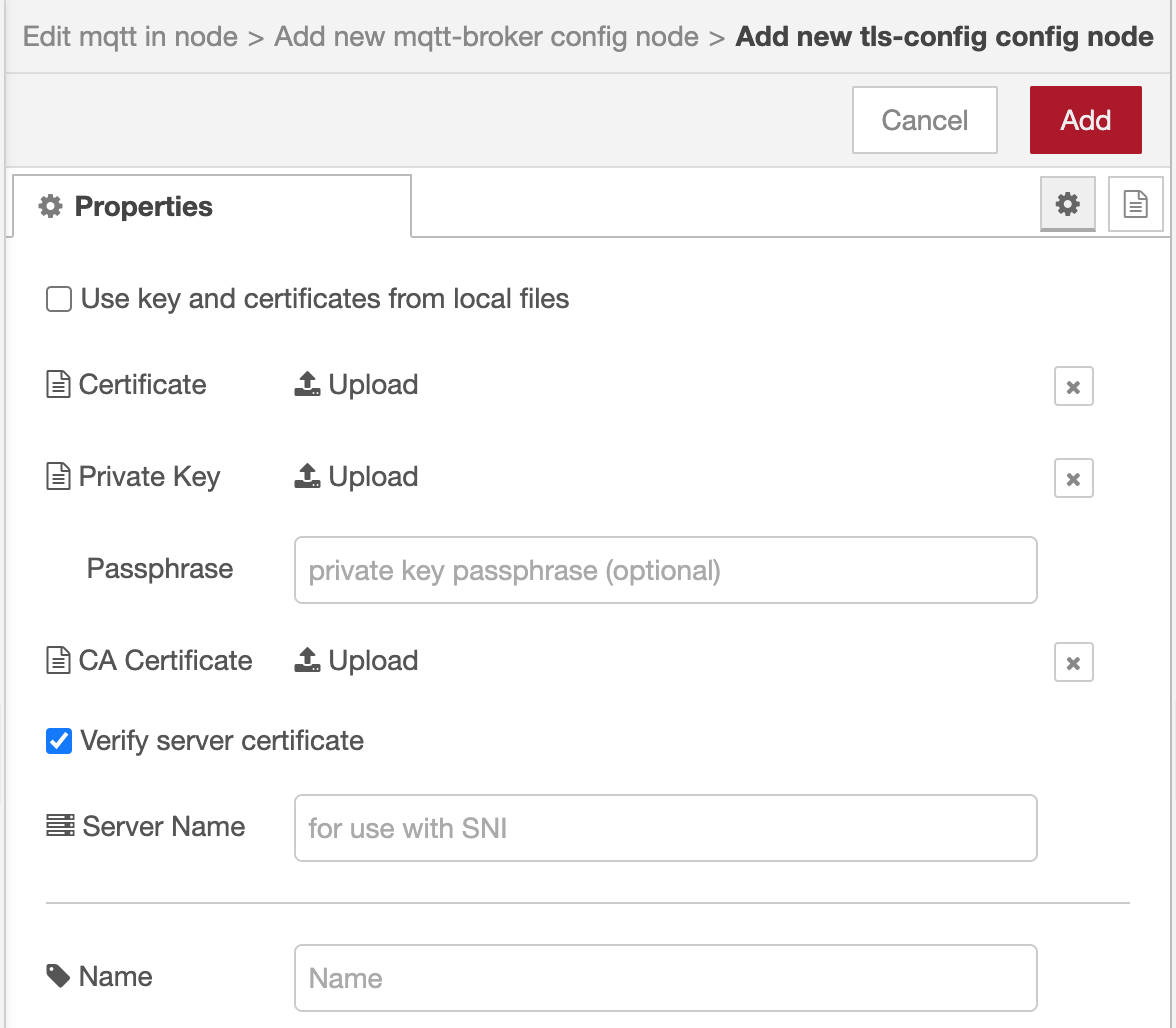
TLS Configuration: select “Add new tls-config…” and click the pencil icon:
-
Just accept the defaults, so click “Add”
-
Back in the “mqtt-broker config” node, select the Security tab:
-
Username: your application id from TTN Console
-
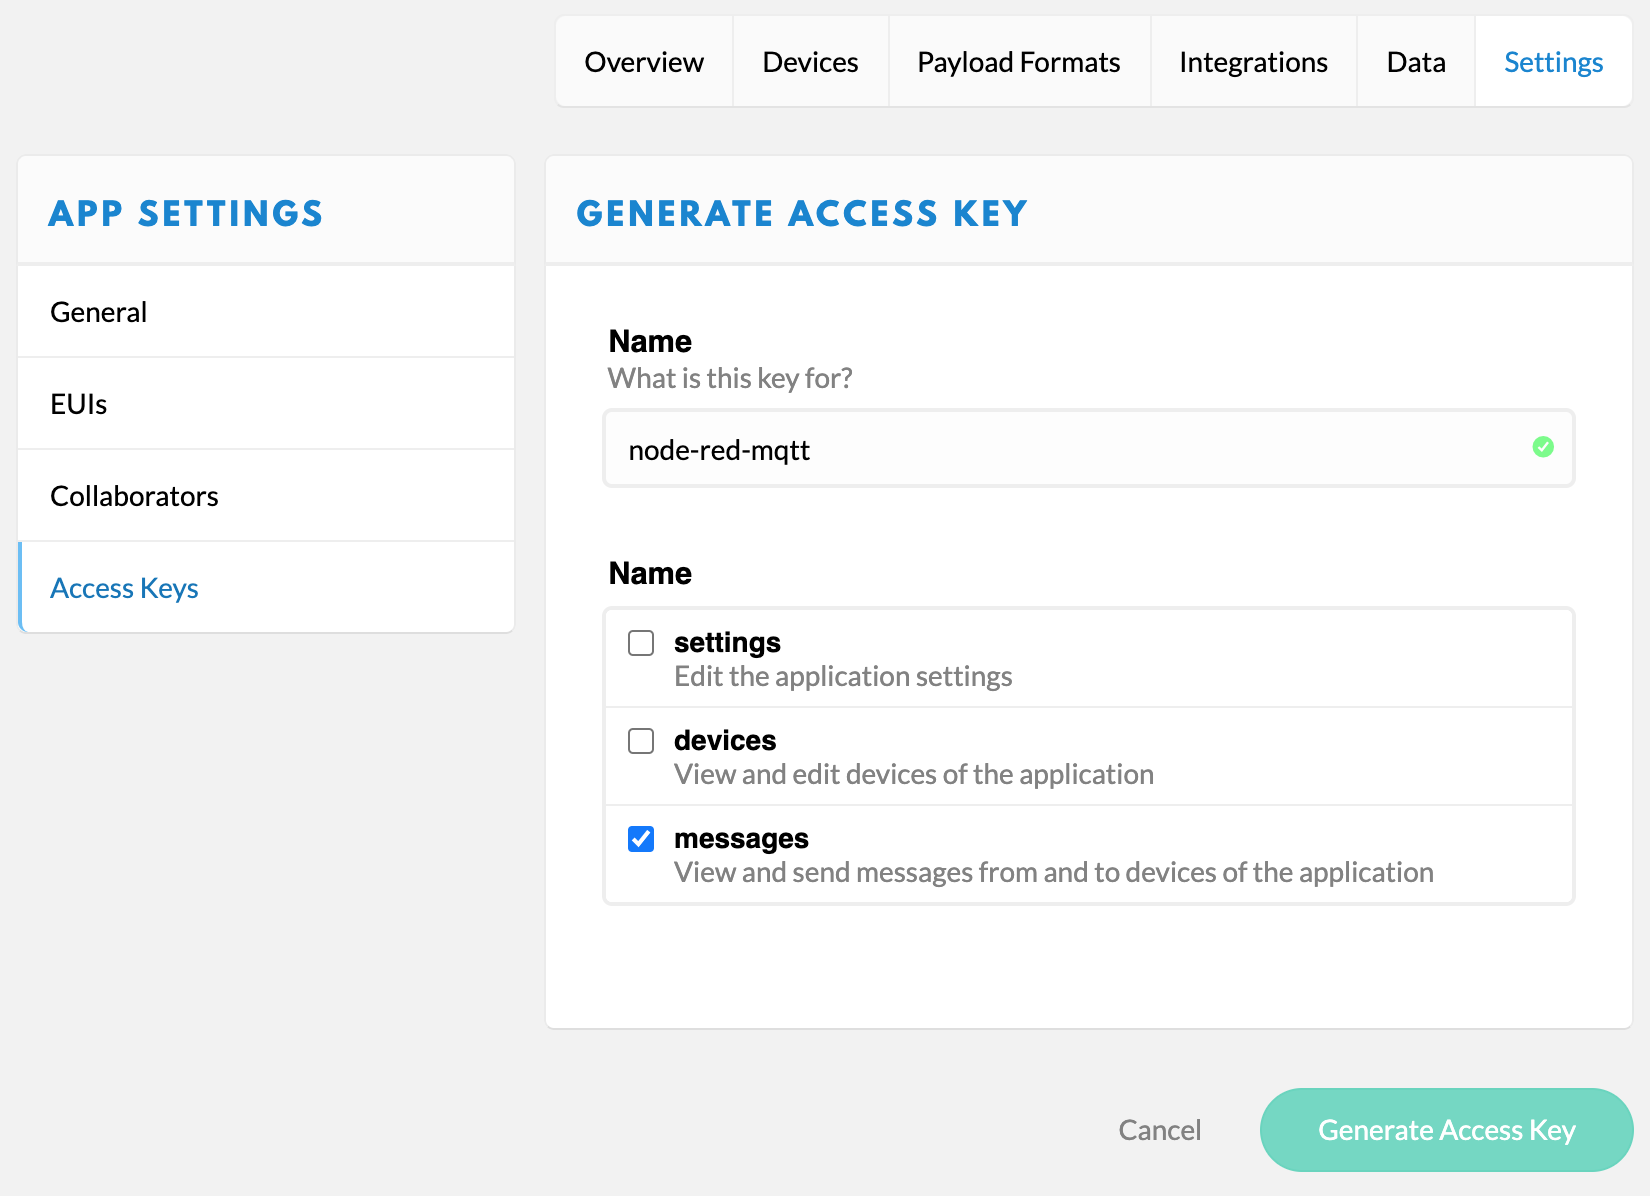
Password: an access key from TTN Console with at least access rights to “messages”, something like
ttn-account-v2.m2xb7...For this, you could use the “default key”, or first generate a key just for Node-RED, through your application’s Settings, Access Keys (or clicking “manage keys” from the application’s Overview):
-
Click “Add”
-
Back in the “mqtt in” node: click “Done”
-
Done!


That’s all as for the MQTT config with standard Node-RED nodes. When adding another “mqtt in” node for a different topic, the broker you just added will already be preselected. Same goes when adding an “mqtt out” node to schedule downlinks. (This creates a single connection with the MQTT broker for the TTN application, regardless the number of “mqtt in” and “mqtt out” nodes.)
JSON text vs a JavaScript object in msg.payload
For older versions of Node-RED that do not support “Output: a parsed JSON object”, you’ll want to convert the JSON text into a full blown JavaScript object before any further handling. Like:
// Convert the MQTT text message into a JavaScript object
msg.payload = JSON.parse(msg.payload);
Note that Node-RED also uses the name payload within its own messages that flow around. So, in Node-RED any msg.payload is not related to the LoRaWAN payload.
Decoding uplinks
When using Node-RED, one can also get rid of any Decoder in the payload formats in TTN Console (which, in rare occasions, may randomly fail or introduce latency). To get the LoRaWAN application payload bytes and port:
// When using a Decoder in the application's Payload Formats in
// TTN Console, then msg.payload.payload_fields is also available.
const bytes = Buffer.from(msg.payload.payload_raw, 'base64');
const port = msg.payload.port;

msg.payload.payload_fields = {
  // Unsigned 16 bits integers, MSB
  battery: (bytes[0] << 8 | bytes[1]) / 1000,
  light: bytes[2] << 8 | bytes[3],

  // Sign-extend 16 bits to 32 bits to support negative values: shift
  // the MSB 16 bits too far to the left, followed by a sign-propagating
  // right shift of 16 bits to effectively shift the MSB 8 bits.
  temperature: (bytes[4] << 24 >> 16 | bytes[5]) / 100
};

return msg;
The byte shifting above could be copied from a TTN Console Decoder as-is. And just like in TTN Console JavaScript will interpret its operands as 32-bits signed integers.
But Node-RED also provides the built-in Buffer utility methods, which are not available in the payload formatters in TTN Console:
msg.payload.payload_fields = {
  // Unsigned 16 bits integers, MSB
  battery: bytes.readUInt16BE(0) / 1000,
  light: bytes.readUInt16BE(2),
  // Signed 16 bits integer, MSB
  temperature: bytes.readInt16BE(4) / 100
};
Scheduling downlinks
To schedule a downlink right after receiving an uplink, simply use msg.payload.app_id and msg.payload.dev_id as provided in the uplink:
// AppID and DevID from the current uplink
const appId = msg.payload.app_id;
const devId = msg.payload.dev_id;
Next, create a downlink payload of one or more bytes, Base64-encode it, and create a message to be published through MQTT:
// Color value from binary RGB string; '110' = 6 = yellow
const color = parseInt(msg.rgb, 2);

// Single-byte payload for the downlink
const bytes = [color];

msg.topic = `${appId}/devices/${devId}/down`;

msg.payload = {
  dev_id: devId,
  port: 1,
  confirmed: false,
  schedule: 'replace',
  payload_raw: Buffer.from(bytes).toString('base64')
};

return msg;
The output of the above can then be passed to an “mqtt out” node, like the one named “mqtt publish” in the screenshot further below.
Beware that the scheduled downlink may not be transmitted until the next uplink is received.
To schedule a downlink at any time (rather than directly after handling an uplink), one may want to use the AppID and DevID from an earlier activation or uplink. In the example further below, that is saved for both uplinks and events, using:
// When scheduling a downlink, we need the AppID and DevID
const levels = msg.topic.split('/');
flow.set('appId', levels[0]);
flow.set('devId', levels[2]);
The values stored in the context can then be used like:
// Get AppID and DevID as saved from last uplink
const [appId, devId] = flow.get(['appId', 'devId']);
Logging errors
For logging, one may want to ensure the topic and time are always included:
// A file node only saves msg.payload, but +/+/+/events/down/scheduled
// holds no details about application, device nor timestamp in the
// MQTT payload, but only:
//   {"message": {"port": 1, "payload_raw": "BA=="}}
// Same goes for TTN-published errors:
//   {"error": "Unable to decode payload fields: Internal error: ..."}}
// So, ensure the topic and time are also saved into the log file:
msg.payload = {
  topic: msg.topic,
  timestamp: new Date().toISOString(),
  payload: msg.payload,
  error: msg.error
}

return msg;
Example flow
Further below is a Node-RED export of an example that handles a few cases for a The Things Node device, and only logs what’s happening. That looks like this:
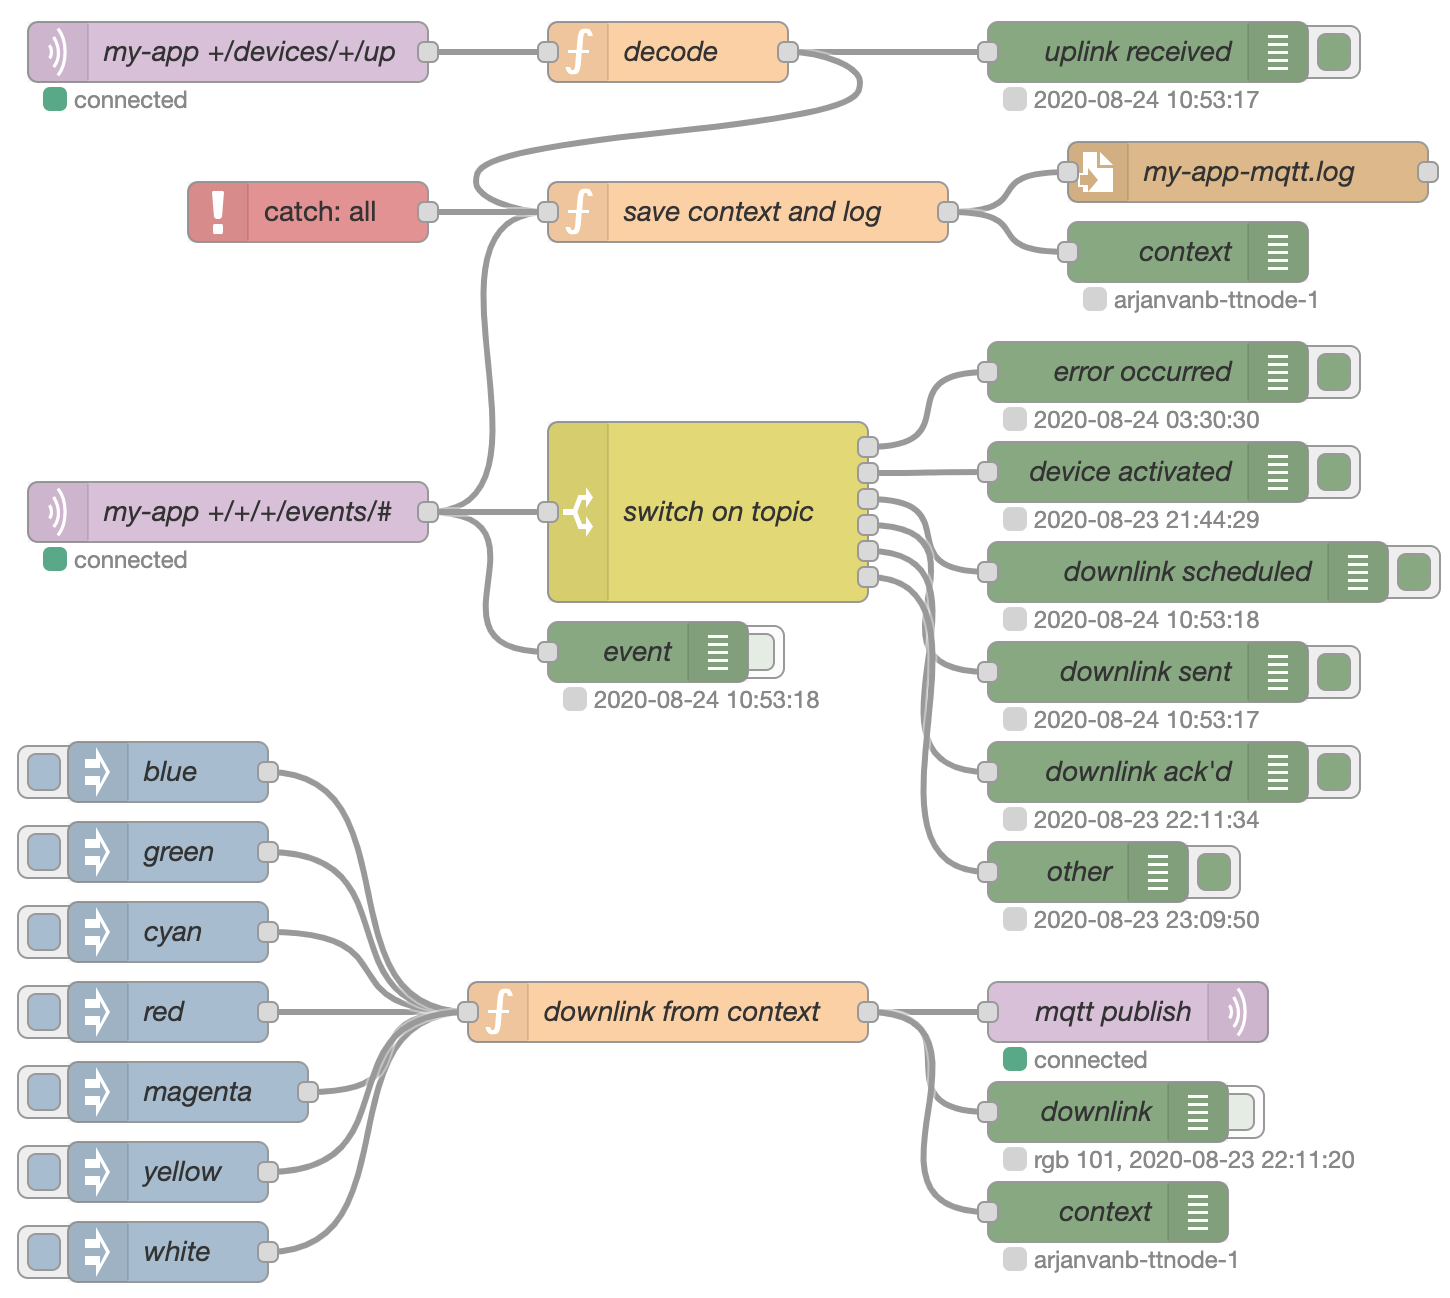
Of course, one can also create multiple, more specific, MQTT subscriptions for the events. In this example, the “switch on topic” node delegates a message from the wildcard +/+/+/events/# to (only) one of its outputs, based on the actual topic, using regular expressions:
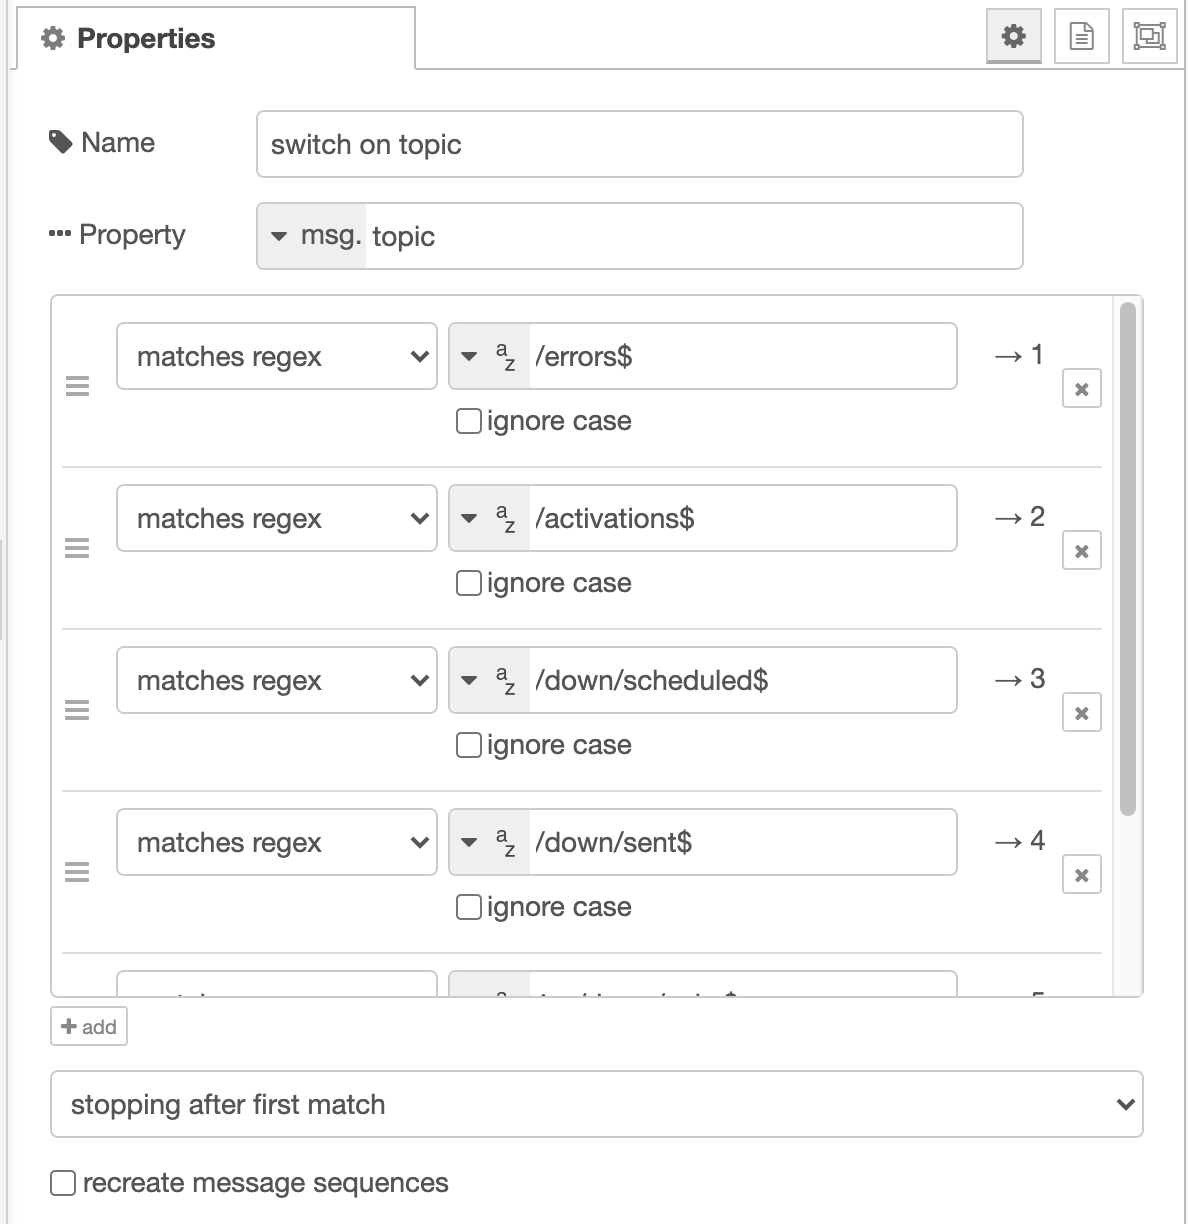
Above, the $ in, e.g., /errors$ means that the topic must end with /errors to match.
Alternative using a function node, also extracting AppID and DevID
flow-ttnode-20200823.json (16.6 KB)
A function node from an earlier version of this forum post achieved the same result, but also extracted the AppID and DevID. Of course, and extra node can still be added to extract those if needed. When using a function node, one needs to manually set the number of outputs of that node:
// Get details from the MQTT topic, e.g.:
//
// - <AppID>/devices/<DevID>/up
// - <AppID>/devices/<DevID>/up/<field>
// - <AppID>/devices/<DevID>/events/up/errors
// - <AppID>/devices/<DevID>/events/create
// - <AppID>/devices/<DevID>/events/update
// - <AppID>/devices/<DevID>/events/delete
// - <AppID>/devices/<DevID>/events/activations
// - <AppID>/devices/<DevID>/events/activations/errors
// - <AppID>/devices/<DevID>/events/down/scheduled
// - <AppID>/devices/<DevID>/events/down/sent
// - <AppID>/devices/<DevID>/events/down/acks
// - <AppID>/devices/<DevID>/events/down/errors
//
// Note that /up/<field> is not supported for EU868; unclear if
// subscribing to a wildcard yields both publication of the full
// payload, plus an additional publication for each field.
//
// Of course, one could also create multiple MQTT subscriptions,
// to be more specific.

const levels = msg.topic.split('/');
msg.appId = levels[0];
msg.devId = levels[2];

// Quick & dirty mapping of topic to events we care about.
// Make sure to change the number of outputs to match this.
return [
  // When subscribing to # rather than +/+/+/events, we could add:
  // levels[3] === 'up' ? msg : null,
  levels[4] === 'activations' ? msg : null,
  levels[5] === 'scheduled' ? msg : null,
  levels[5] === 'sent' ? msg : null,
  levels[5] === 'acks' ? msg : null,
  levels.slice(-1)[0] === 'errors' ? msg : null
];
After importing the following flow, you’ll need to set the username and password for the MQTT Broker.
flow-ttnode-20200824.json (17.4 KB)